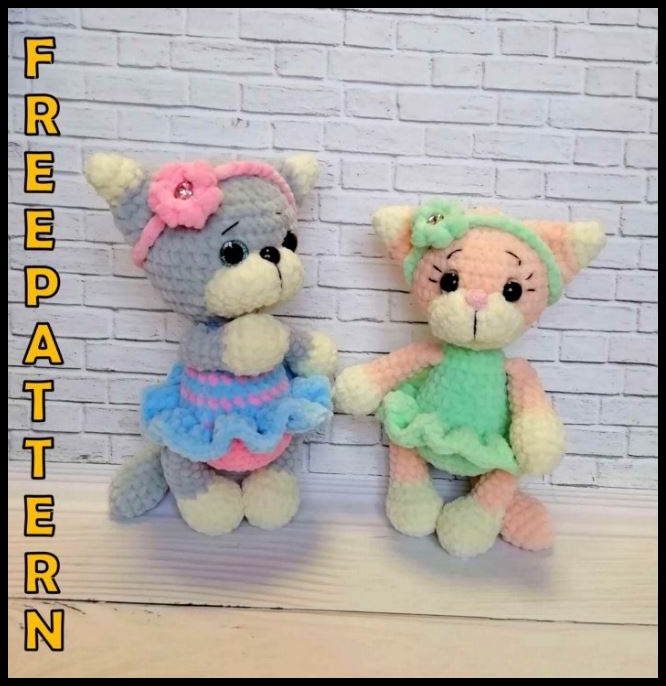
Amigurumi Velvet Cute Cat Free Crochet Pattern
Welcome to our website where you can find the most beautiful and highest quality samples of Amigurumi patterns. All the amigurumi patterns you can’t find are available on our website. Every day we continue to share new amigurumi patterns for you. Stay tuned to reach these amigurumi patterns before anyone else
Abbreviations:
SC – single crochet
İNC – increase
DEC – decrease
CH – chain
FOR KNITTING A CAT I NEED:
– Yarn Himalaya dolphin baby, colors you can choose any;
– Hook # 3,5;
– Filler holofiber;
– Eyes on a secure mount with a diameter of 16 mm;
– Cotton yarn pink (for a nose) Or a finished nose, black and
white
– A needle with a wide eye.
Using these materials the toy turns out to be approximately 22
see. Paws and tail get tied, we sew only ears and a muzzle.
It fits simply and quickly. I hope you have a wonderful spring
baby Easy eyelets for you!
LOWER FEET
We start in white, fill
only the lower part of the foot is tight
1 p. 6 loops in an amigurumi ring
2 p. 6 inc = 12 sc
3 p. (1sc 1 inc) * 6 = 18 sc
4 – 5 p. 18 sc
6 p. 6 Dec, 6 sc = 12 sc
7 p. 1 sc, 2 Dec, 7 sc = 10 sc
Change the thread color
8-13 p. 6 rows of 10 sc (on the left
leg in the last row of 8 sc to
clawed legs)
Then we fold the part and
sew 5 sc. We fix the thread,
cut off.
UPPER FEET
We start in white, fill
only the lower part of the foot.
1 p. 6 loops in an amigurumi ring
2 p. 6 inc = 12 sc
3 p. (3 sc 1 inc) * 3 = 15 sc
4 p. 15 sc
5 p. (3 sc 1 Dec) * 3 = 12 sc
Change the thread color
6 p. (2 sc 1 Dec) * 3 = 9 sc
7-11 p. 9 sc
Fold the part, sew 4 sc.
We fix the thread, cut it off.
TAIL
1 p. 6 loops in an amigurumi ring
2 p. 6 inc
3-5 p. 12 sc
6 p. (4 sc 1 Dec) * 2 = 10 sc
7 p. 10 sc
8 p. (3 sc 1 Dec) * 2 = 8 sc
9-17 p. 8 sc, sl-st
We fix the thread, cut it and hide it in the tail.
Muzzle
1 p. 6 loops in an amigurumi ring
2 p. 6 inc = 12 sc
3 p. (1 sc 1 inc) * 6 = 18 sc
4 p. 3 sc, 3 inc, 6 sc, 3 inc, 3 sc = 24 sc
5 p. 24 sc, sl-st
Cut the thread, leaving the length on
sewing on.
EARS
1 p. 6 loops in an amigurumi ring
2 p. (2 sc 1 inc) * 2 = 8 sc
3 p. (3 sc 1 inc) * 2 = 10 sc
Change the color of the thread.
4 p. (4 sc 1 inc) * 2 = 12 sc
5 p. (2 sc 1 inc) * 4 = 16 sc
6 p. (3 sc 1 inc) * 4 = 20 sc, sl-st
Cut the thread, leaving the length on
sewing on.
BODY HEAD
We start with the color chosen for the dress. When tying the paws
watch for symmetry. Fill as you knit.
1 p. 6 loops in an amigurumi ring
2 p. 6 inc = 12 sc
3 p. 12 inc = 24 sc
4 p. (3 sc 1 inc) * 6 = 30 sc
5 p. 30 sc
6 p. 4 sc, 5 sc with foot, 12 sc, 5 sc with foot, 2 sc. Fold the tail and
we knit 2 sc to the torso.
7 p. The remaining 2 sc with tail, 28 sc
8 p. 30 sc
9 p. 30 sc for ЗSC
10 p. 8 sc, (1 Dec 2 sc) * 4, 6 sc = 26 sc
11 p. 26 sc
12 p. 3 sc, 1 Dec, (2 sc 1 Dec) * 4, 3 sc, 1 Dec = 20 sc
13-14 p. 20 sc
15 p. 4 sc, 4 sc with handle, 6 sc, 4 sc with handle, 2 sc = 20 sc
16 p. (2 sc 1 Dec) * 5 = 15 sc
17 p. (3 sc 1 Dec) * 3 = 12 sc
We start to knit a head. Change the thread color
18 p. 12 inc = 24 sc
19 p. (3 sc 1 inc) * 6 = 30 sc
20 p. (4 sc 1 inc) * 6 = 36 sc
21 p. (5 sc 1 inc) * 6 = 42 sc
22-26 p. 42 sc
27 p. (5 sc 1 Dec) * 6 = 36 sc
Sew the muzzle between 18 and 25 next. Stuffing is not tight. Insert
eyes on a secure mount between 24 and 25 side by side with a 6-loop position
between them. We stuff the head tightly as we knit.
28 p. (4 sc 1 Dec) * 6 = 30 sc
29 p. (3 sc 1 Dec) * 6 = 24 sc
30 p. (2 sc 1 Dec) * 6 = 18 sc
31 p. (1 sc 1 Dec) * 6 = 12 sc
32 p 6 Dec we tighten the hole we cut the thread hide
Sew on ears
face design
Take a long section of black thread (I have cotton yarn). Enter the needle at the point
1 green, there will be a mouth. Then go to point 2, then 3 and print to 4,
where did they start. The other side is similar. Then we pull the threads, pulling.
Knots the knots
we do not cut the thread.
Continue
design of the same
a thread.
The nose can be embroidered, can be glued,
at your discretion 🙂
We knit a skirt for the front loops 9
a number of bodies. In the first loop we introduce
hook, drag the thread, do 3
ch, then another 2 dc in the same loop.
Then we knit the whole row of 3 dc in
every loop. After that we do more
one row of 1 sc per loop.
Headband
We collect 6 loops in the amigurumi ring. Next, we knit lush columns in
each loop: yarn and elongated loop three times in one loop, then
we knit together, we get 1 vertex. Then do sl-st in the same loop. So
repeat 5 more times. After that we make 2 sl-st to the middle of the flower from the back
his side. We gather the right amount of ch (see the head circumference
your cat, I have it 40 ch), try on. Then we fix on the reverse
side of the flower, cut the thread, fasten, hide the tail. In the recess
a flower can be sewn or glued with a strassik or bead.