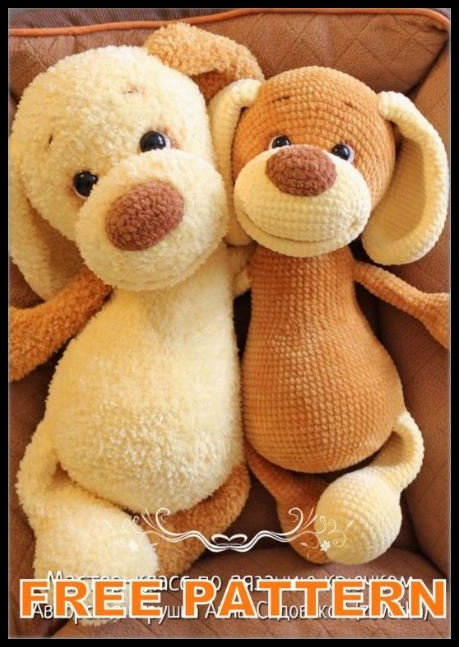
Amigurumi Happy Cute Dog Free Crochet Pattern
In this article we will share the amigurumi cute dog free crochet pattern. Amigurumi related to everything you can not find and share with you.
Termonology
MR Magic Ring
Ch Chain
Sl st slip stitch
Sc single crochet
Hdc half double crochet
Dc double crochet
Tr (or trc) triple (or treble) crochet
Inc increase (Add one or more stitches.)
Dec decrease (Eliminate one or more stitches.)
You will need:
1. Himalaya “Koala” (100% micropolyester, 100 m / 100 g) – 6 skeins (with a small margin). Tie
plain dog or combine 2 colors – in this case, take 4 + 2 or 3 + 3 skeins.
Hook 4.5 mm or any other convenient for you. For the nose you need a thread of a similar footage
or a little thinner. I have Himalaya “Dolphin Baby” color 80337 milk chocolate, hook 4 mm.
2. Filler (holofiber) – 200-300 g.
3. Black eye buttons, I have a diameter of 20 mm.
4. A small piece of white foamiran (plastic suede) or felt for eye protein. Thickness
foamirana – 2 mm.
5. Mouline thread or Iris brown for embroidery eyebrows.
6. Needle with a blunt end for securing the ends of the threads and sewing parts, a long needle for
sewing on the eye.
7. Optionally – a dry pastel for tinting, you can tint with whatever you like
way.
When using these materials, the dog turns out to be 50 cm tall.
We knit correctly
The toy is knitted in a spiral, without connecting posts and lifting loops.
Front side of the part: Wrong side of the part:
The description of knitting of this toy is based on the fact that the beginning of the row throughout knitting
the entire part does not move and runs in a straight line, but since we knit in a spiral, without loops
lifting and connecting column, the beginning of the row will shift right, so every 4-5
rows need to be knit at the end of the row an additional column of displacement, so that the beginning of the row again
It turned out to be in the same place. These additional columns in the description of the series are not taken into account.
Thanks to this way of presenting the description, you will always know where exactly you should have
increase or decrease, and the elbow / knee will always be exactly where they should be.
The offset of the beginning of the row when knitting in a spiral may differ for different yarns and for different
density of knitting, so aligning the marker makes the description universal – from any yarn, in
any hands will get exactly such a detail as it should be.
If you knit from Himalaya “Koala”, Alize “Softy” or other similar thread, before starting work
inspect all hanks and compare the amount of pile on the thread-basis. Even in one lot, there are hanks with
different pile. Do not use these skeins to knit paired parts. Put them on your body or head,
or knit both paired parts from one skein.
Upper legs
Until the fifth row, the marker is not shifted, then follow the instructions in microns.
1 row: 6 ch, from the second loop from the hook: 4 sc, 3 sc to the first loop, on the other side of the chain: 3 sc, inc (12)
2 row: inc, 3 sc, inc x 3, 3 sc, inc x 2 (18)
3 row: (7 sc, inc x 2) x 2 (22)
4 row: 8 sc, inc x 2, 9 sc, inc x 2, sc (26)
5 row: 23 sc, we do not tie the row to the end, we put a marker here. Now the beginning of the series will be here – this
middle of the outside of the foot. As a guideline of the middle – the chain of the first row – the beginning of the row should
be opposite. If this is not the case, tie up another column or move the marker to the column to the right.
Align the marker during the knitting process.
6-8 rows (3 rows): 26 sc (26)
9 row: 11 sc, dec x 2, 11 sc (24)
10 row: 10 sc, dec x 2, 10 sc (22)
11 row: 9 sc, dec x 2, 6 sc, dec, sc (19)
12 row: sc, dec, 5 sc, dec x 2, 7 sc (16)
13 row: 13 sc, dec, sc (15)
14 row: sc, dec, 9 sc, dec, sc (13)
15 row: sc, dec, 10 sc (12)
Fill the foot with filler, loose. It
should remain flat and soft. The upper (narrow) part of the foot is NOT stuffed.
16-27 rows (12 rows): 12 sc (12)
Mark the 6th sc in the last row of the right foot with an extra marker.
We cut the thread, fix it. We knit the second foot in the same way.
Lower paws
Until the fifth row, the marker is not shifted, then follow the instructions in microns.
1 row: 9 ch, from the second loop from the hook: 7 sc, 3 sc to the first loop, on the other side of the chain: 6 sc, inc (18)
2 row: inc, 6 sc, inc x 3, 6 sc, inc x 2 (24)
3 row: inc, 9 sc, inc x 3, 9 sc, inc x 2 (30)
4 row: (12 sc, inc x 3) x 2 (36)
5 row: 34 sc, we do not tie the row to the end, we put a marker here. Now the beginning of the series will be here – this
mid heel. As a guideline of the middle – the chain of the first row – the beginning of the row should be
opposite. If this is not the case, tie up another column or move the marker to the column to the right.
Align the marker during the knitting process.
6-11 rows (6 rows): 36 sc (36)
12 row: 13 sc, dec, (2 sc, dec) x 2, 13 sc (33)
13 row: 13 sc, dec, (sc, dec) x 2, 12 sc (30)
14 row: 12 sc, dec x 3, 5 sc, (dec, sc) x 2, dec (use the first column of the next row) (24)
15 row: (sc, dec) x 2, 18 sc (22)
16 row: 19 sc, dec, sc (21)
17 row: sc, dec, 18 sc (20)
Fill the foot with filler, loose. Top (narrow)
part of the foot is NOT stuffed.
18-29 rows (12 rows): 20 sc (20)
Mark the 10th sc in the last row of the right foot with an extra marker.
We cut the thread, fix it. We knit the second foot in the same way.
Body
The marker at the beginning of the row runs in the middle of the back.
1 row: 2 ch, 6 sc in the first loop (6)
2 row: inc x 6 (12)
3 row: (inc, sc) x 6 (18)
4 row: sc, inc, (2 sc, inc) x 5, sc (24)
5 row: (3 sc, inc) x 6 (30)
6 row: 2 sc, inc, (4 sc, inc) x 5, 2 sc (36)
Place the second marker in the middle of the row to notice errors earlier.
7 row: (5 sc, inc) x 6 (42)
8 row: 3 sc, inc, (6 sc, inc) x 5, 3 sc (48)
9 row: (7 sc, inc) x 6 (54)
10 row: 4 sc, inc, (8 sc, inc) x 5, 4 sc (60)
11 row: (9 sc, inc) x 6 (66)
12 row: 5 sc, inc, (10 sc, inc) x 5, 5 sc (72)
13 row: (11 sc, inc) x 6 (78)
14 row (knit the lower paws): 14 sc, apply the left lower paw to the body, enter
hook to the last column of the foot, then to the body column along the knitting and knit 10 sc through 2
paintings:
continue to knit on the body: 30 sc, put the right lower foot to the body, insert the hook into
marked column of the foot, then into the body column along the knitting and knit 10 sc through 2 canvases:
continue to knit on the body: 14 sc (78)
In the next row, when passing from the body to the foot and from the foot to the body, small holes may occur.
To avoid them, I recommend in these places to capture the corner loops (which do not participate in knitting) and knit them as a decrease along with the working column. Use the same method when knitting the upper legs and head.
15 row: 14 sc, 10 sc along the free loops of the left lower foot, 30 sc, 10 sc along
loops of the lower right foot, 14 sc (78)
16-24 rows (9 rows): 78 sc (78)
25 row: (dec, 11 sc) x 6 (72)
26 row: 72 sc (72)
27 row: 5 sc, dec, (10 sc, dec) x 5, 5 sc (66)
28 row: 66 sc (66)
29 row: (dec, 9 sc) x 6 (60)
30 row: 60 sc (60)
31 row: 17 sc, dec, (6 sc, dec) x 3, 17 sc (56)
32 row: 25 sc, dec, 2 sc, dec, 25 sc (54)
33 row: 54 sc (54)
34 row: (dec, 7 sc) x 6 (48)
35-39 rows (5 rows): 48 sc (48)
In the next row we knit the upper legs similarly to the lower ones.
40 row (we knit the upper legs): 9 sc, 6 sc together with the left foot, continue to knit
body: 18 sc, 6 sc together with the right foot, continue to knit on the body: 9 sc (48)
41 row: 9 sc, 6 sc along the free loops of the left foot, continue to knit over the body: 18 sc, 6 sc
on the free loops of the right foot, continue to knit on the body: 9 sc (48)
42-44 rows (3 rows): 48 sc (48)
45 row: 3 sc, dec, (6 sc, dec) x 5, 3 sc (42)
46 row: (dec, 5 sc) x 6 (36)
47 row: 2 sc, dec, (4 sc, dec) x 5, 2 sc (30)
In the next row we mark with an additional marker
18th sc.
48 row: (dec, 3 sc) x 4, dec, sc (mark it with an additional marker), 2 sc, dec, 3 sc (24)
We cut the thread, fix it. We stuff the body
filler, loose. The body should remain soft.
Head
Until the sixth row, the marker is not shifted, then follow the instructions in microns.
1 row: 13 ch, from the 2nd loop from the hook: 11 sc, 3 sc to the last loop, on the other side of the chain: 10 sc, inc (26)
2 row: inc, 10 sc, inc x 3, 10 sc, inc x 2 (32)
3 row: sc, inc, 11 sc, inc, (sc, inc) x 2, 11 sc, inc, sc, inc (38)
In the next row, we mark the 19th sc with an additional marker.
4th row: sc, inc, 12 sc, inc, 2 sc (mark the second column with an additional marker), inc,
2 sc, inc, 12 sc, inc, 2 sc, inc, sc (44)
5 row (we knit a hole for the mouth): 20 ch, 18 sc skip, continue to knit with
the column marked in the previous row: inc, 3 sc, inc, 16 sc, inc, 3 sc, inc (50)
6 row: 20 sc in a chain, 15 sc, row to kwe do not tie the end, we put a marker here. Now the beginning of the row
will be here – this is the middle of the upper part of the nose. We align the marker in the process of knitting the head.
7-10 rows (4 rows): 50 sc (50)
While we put off knitting the head and knit ROTIK. Pull the end of the thread from the middle of the skein or
use a thread from another hank. We unfold the muzzle with the beginning of knitting to ourselves and attach
thread to the corner of the knitted hole on the right side:
1 row: 1 sc in the corner, 18 sc in the missing columns of the muzzle, 1 sc in the corner, 20 sc in
chain (40)
On the edge of the connected columns we stretch a contrasting thread – it will help you orient yourself where
insert the hook when closing the mouth opening.
2 row: 40 sc (40)
Pull the small end of the thread (so that it is enough for 20 sl-st) and cut it. Turn the mouth inside
muzzle and pull the working thread:
We continue to knit the connecting posts through 2 canvases, introducing the hook into the marked with a marker
loops (i.e. we knit under the loops of the previous row):
We knit 20 sl-st to the end of the mouth. We fix the thread, cut off the excess and twist the muzzle on
front side.
We continue to knit the head.
11 row: 42 sc, (dec, sc) x 2, dec (47)
12 row: dec, (sc, dec) x 2, 31 sc, (dec, 2 sc) x 2 (42)
13 row: (2 sc, dec) x 2, 34 sc (40)
If you want to make the muzzle a different color, in the 14th row after the 20th column, replace the thread (so,
so that the color transition falls on the lower part of the head and is invisible).
14 row: 29 sc, inc, (sc, inc) x 5 (46)
15 row (we knit a hole under the left eye): (inc, sc) x 5, inc, 20 sc, (inc, 2 sc) x 3, inc, 1 ch,
1 sc skip, sc, inc, 2 sc (57)
16 row (we knit a hole under the right eye): 2 sc, inc, sc, 1 ch, 1 sc skip, inc,
(2 sc, inc) x 3, 42 sc (62)
17 row: 49 sc, inc, (3 sc, inc) x 3 (66)
18 row: (inc, 3 sc) x 3, inc, 53 sc (70)
19 row: 57 sc, inc, (3 sc, inc) x 3 (74)
20 row: (inc, 3 sc) x 3, inc, 61 sc (78)
21 row (we knit the body): 33 sc, put the head to the body, insert the hook into the marked column
body from the wrong side to the outside, then into the head column along the knitting and knit 12 sc through 2
webs, continue to knit on the head: 33 sc (78)
22 row: 33 sc, continue to knit on the free columns of the body: 12 sc on the body, continue to knit
on the head: 33 sc (78)
23-28 rows (6 rows): 78 sc (78)
29 row: (dec, 11 sc) x 6 (72)
30 row: 5 sc, dec, (10 sc, dec) x 5, 5 sc (66)
31 row: (dec, 9 sc) x 6 (60)
32 row: 4 sc, dec, (8 sc, dec) x 5, 4 sc (54)
33 row: (dec, 7 sc) x 6 (48)
34 row: 3 sc, dec, (6 sc, dec) x 5, 3 sc (42)
35 row: (dec, 5 sc) x 6 (36)
36 row: 2 sc, dec, (4 sc, dec) x 5, 2 sc (30)
We fill the head with filler. Very neatly with a muzzle, do not overwork it. Hold your mouth in
the process of stuffing so that it doesn’t twist. Do not stuff the lower lip. Stuff your neck separately
so that the head does not dangle.
37 row: (dec, 3 sc) x 6 (24)
38 row: sc, dec, (2 sc, dec) x 5, sc (18)
Fill the filler to the end. If the head falls over under the weight of the muzzle – add
filler in the back of the head.
39 row: (dec, sc) x 6 (12)
40 row: dec x 6 (6)
We cut the thread, fix it.
Ears
The marker in this part is not aligned.
1 row: 2 ch, 6 sc in the first loop (6)
2 row: inc x 6 (12)
3 row: (inc, sc) x 6 (18)
4 row: sc, inc, (2 sc, inc) x 5, sc (24)
5 row: (3 sc, inc) x 6 (30)
6 row: 2 sc, inc, (4 sc, inc) x 5, 2 sc (36)
7-11 rows (5 rows): 36 sc (36)
12 row: (dec, 16 sc) x 2 (34)
13 row: 34 sc (34)
14 row: (dec, 15 sc) x 2 (32)
15 row: 32 sc (32)
16 row: (dec, 14 sc) x 2 (30)
17 row: 30 sc (30)
18 row: (dec, 13 sc) x 2 (28)
19 row: 28 sc (28)
20 row: (dec, 12 sc) x 2 (26)
21 row: 26 sc (26)
22 row: (dec, 11 sc) x 2 (24)
23 row: 24 sc (24)
24 row: (dec, 10 sc) x 2 (22)
25 row: 22 sc (22)
26 row: (dec, 9 sc) x 2 (20)
27 row: 20 sc (20)
28 row: (dec, 8 sc) x 2 (18)
29 row: 18 sc (18)
30 row: (dec, 7 sc) x 2 (16)
31 row: 16 sc (16)
32 row: (dec, 6 sc) x 2 (14)
33 row: 14 sc (14)
We cut the thread, fix it. Fold the part
in half.
We knit the second eye in the same way. Do not stuff ears
need to.
Tail
The marker in this part is not aligned.
1 row: 2 ch, 6 sc in the first loop (6)
2 row: inc x 6 (12)
3-5 rows (3 rows): 12 sc (12)
6-14 rows (9 rows): dec, 3 sc, inc x 2, 3 sc, dec (12)
We cut the thread, fix it. Fill the tip of the tail with filler.
Nose
The marker in this part is not aligned.
IF YOU KNIT YOUR SHOE WITH THE SAME YARNES YOU KNIT THE DOG:
1 row: 5 ch, from the 2nd loop from the hook: 3 sc, 3 sc to the last loop, on the other side of the chain: 2 sc, inc (10)
2 row: inc, 2 sc, inc x 3, 2 sc, inc x 2 (16)
3 row: sc, inc, 3 sc, (inc, sc) x 2, inc, 3 sc, inc, sc, inc (22)
4 row: 22 sc (22)
We cut the thread, fix it.
FOR COMBINING HIMALAYA “KOALA” + HIMALAYA “DOLPHIN
BABY “:
1 row: 7 ch, from the 2nd loop from the hook: 5 sc, 3 sc to the last loop, on the other side of the chain: 4 sc, inc (14)
2 row: inc, 4 sc, inc x 3, 4 sc, inc x 2 (20)
3 row: sc, inc, 5 sc, (inc, sc) x 2, inc, 5 sc, inc, sc, inc (26)
4 row: 26 sc (26)
We cut the thread, fix it.
Registration
We sew all the details with sewing thread in several additions. Not sure how to sew the parts neatly?
Watch the video here.
Sew the tail. The lower point of the tail (the end of knitting) is located at the level of the lower legs,
the top point of the tail is 4-5 rows higher.
Sew on the spout by adding a little filler.
From white foamiran or felt, we cut out the whites of the eyes, slightly larger than the selected eyes in size. Eyes we sew with a strong thread, I use Iris and I embroider the eyebrows with it.
We introduce a long needle into the left corner of the mouth and withdraw into the hole for the right eye. Pick up
eye loop, insert the needle into the same hole and withdraw at the point of the left eye.
We grab the eye loop, insert the needle into the same hole and bring it to the right corner of the mouth.
Insert the needle into the left corner of the mouth (the thread goes over the canvas), put it in the place of the right eyebrow, a little
tighten so that the thread drowned in her mouth.
We embroider the eyebrows and return to the starting point. We tie the ends of the threads to several knots and
hide inside the head.
Sew on the ears in any position you like. First, sew the bottom of the eyelet, and then
the top one.
You can toned the area around the eyes, eyebrows and mouth. On fluffy yarn you can cut a little
pile in the mouth – the smile will become more pronounced.
Did you like to knit with me? Come to the forum
“Knitted life” and create in a big company
enthusiastic needlewomen!