Amigurumi Basic Dog Free Crochet Pattern
Welcome to our website where you can find the most beautiful and highest quality samples of Amigurumi patterns. All the amigurumi patterns you can’t find are available on our website. Every day we continue to share new amigurumi patterns for you. Stay tuned to reach these amigurumi patterns before anyone else
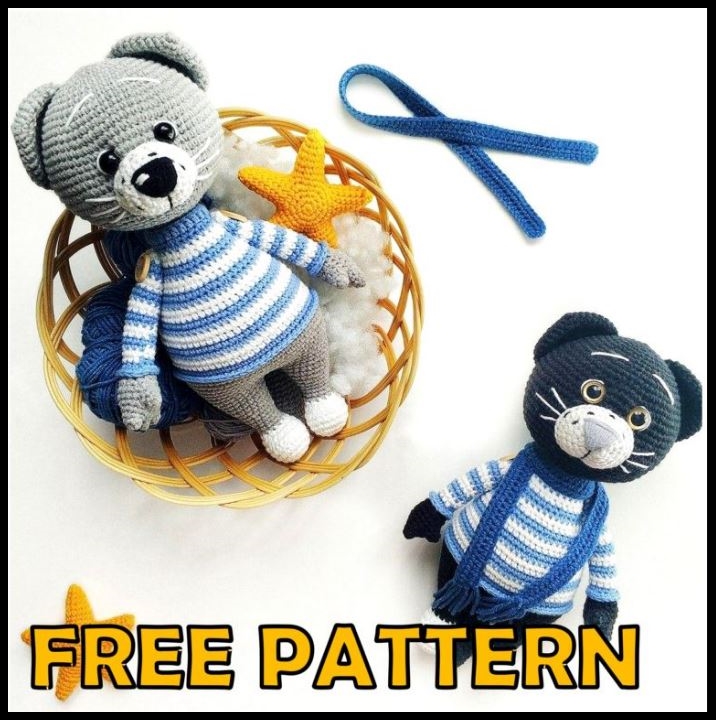
1. Yarn Yarn Art Jeans of a gray (46), white (62), light blue (15), blue (17) colors;
2. Some black yarn for decoration of the nose;
3. The hook №2;
4. Stuffing (hollofayber);
5. Two halfbeads 10 mm in diameter for the eyes;
6. Two buttons for attaching the arms;
7. Сotton buds for strengthening the neck;
8. Adhesive plaster for connections of cotton buds;
9. A thick needle for sewing of the details;
10. Scissors;
11. А moment glue or glue gun.
ABBREVIATIONS
MR – magic ring;
ch – chain;
sl st – slip stitch;
sc – single crochet;
hdc – half double crochet;
dc – double crochet;
inc – increase (crochet two sc in 1 loop);
dec – decrease (crochet two sc together);
bk lp – back loop.
LEGS
Begin with a white thread. Stuff tightly in the
course of crocheting. Crochet chain 6 ch and insert
the hook in the 2nd loop from the hook.
1 rnd: 4 sc, 3 sc in 1 loop, 3 sc, inc (12);
2 rnd: inc, 3 sc, 3 inc, 3 sc, 2 inc (18);
3 rnd: 1 sc, inc, 3 sc, (1 sc, inc)*3, 3 sc,
(1 sc, inc)*2 (24);
4-6 rnd: 24 sc;
7 rnd: 5 sc, 6 dec, 7 sc (18);
8 rnd: 1 sc, dec, 1 sc, 4 dec, 1 sc, dec, 3 sc (12);
Change the yarn to the gray color.
9-11 rnd: 12 sc;
12 rnd: (3 sc, inc)*3 (15);
13 rnd: 15 sc;
14 rnd: 2 sc, inc, (4 sc, inc)*2, 2 sc (18);
15 rnd: 18 sc;
16 rnd: (5 sc, inc)*3 (21);
17 rnd: 21 sc.
Crochet the additional 5 sc and finish the crocheting
of this row, cut the yarn, fasten off. Crochet second
leg the same way, crochet the additional 15 sc and
finish the crocheting of 17th
row, don’t cut the yarn.
BODY
Crochet chain 3 ch from the 2nd leg, insert the hook in the last loop of the last row of the 1st leg and crochet
around. Stuff tightly in the course of crocheting.
18 rnd: 21 sc on the 1st leg, 3 sc on the one side of the chain, 21 sc on the 2nd leg, 3 sc on the other side of the
chain (48);
19 rnd: (7 sc, inc)*6 (54);
20 rnd: 54 sc;
21 rnd: 4 sc, inc, (8 sc, inc)*5, 4 sc (60);
22 rnd: 60 sc;
23 rnd: (9 sc, inc)*6 (66);
24-25 rnd: 66 sc;
Crochet the additional 33 sc.
Change the yarn to the light blue color.
26 rnd: 66 sc;
27 rnd: crochet for the back loop 66 sc;
Change the yarn to the white color.
28 rnd: 66 sc;
29 rnd: 15 sc, dec, 31 sc, dec, 16 sc (64);
Change the yarn to the light blue color.
30 rnd: 64 sc;
31 rnd: (dec, 30 sc)*2 (62);
Change the yarn to the white color.
32 rnd: 62 sc;
33 rnd: 14 sc, dec, 29 sc, dec, 15 sc (60);
Change the yarn to the light blue color.
34 rnd: 60 sc;
35 rnd: (13 sc, dec)*4 (56);
Change the yarn to the white color.
36 rnd: 56 sc;
37 rnd: 6 sc, dec, (12 sc, dec)*3, 6 sc (52);
Change the yarn to the light blue color.
38 rnd: 52 sc;
39 rnd: (11 sc, dec)*4 (48);
Change the yarn to the white color.
40 rnd: 48 sc;
41 rnd: 3 sc, dec, (6 sc, dec)*5, 3 sc (42);
Change the yarn to the light blue color.
42 rnd: 42 sc;
43 rnd: (5 sc, dec)*6 (36);
Change the yarn to the white color.
44 rnd: 36 sc;
45 rnd: 2 sc, dec, (4 sc, dec)*5, 2 sc (30);
Change the yarn to the light blue color.
46 rnd: 30 sc;
47 rnd: (3 sc, dec)*6 (24);
Change the yarn to the gray color.
48 rnd: crochet for the back loop 24 sc;
49 rnd: 1 sc, dec, (2 sc, dec)*5, 1 sc (18);
50 rnd: 18 sc.
Cut the yarn, leaving a long end enough for
sewing of the head.
Attach the light blue yarn to the last front
loop of the 26th row and crochet around 66
sc. Cut the yarn, fasten off.
Attach the light blue yarn to the first front
loop of the 48th row and crochet around 2 ch,
23 dc, sl st to join in the end. Cut the yarn,
fasten off.
TAIL
Stuff tightly in the course of crocheting.
1 rnd: 4 sc in MR;
2 rnd: 4 inc (8);
3 rnd: 8 sc;
4 rnd: (1 sc, inc)*4 (12);
5 rnd: 12 sc;
6 rnd: 1 sc, inc, (2 sc, inc)*3, 1 sc (16);
7-11 rnd: 16 sc;
12 rnd: dec, 14 sc (15);
13 rnd: 15 sc;
14 rnd: dec, 13 sc (14);
15 rnd: 14 sc;
16 rnd: dec, 12 sc (13);
17 rnd: 13 sc;
18 rnd: dec, 11 sc (12);
19 rnd: 12 sc;
20 rnd: dec, 10 sc (11);
21 rnd: 11 sc;
22 rnd: dec, 9 sc (10);
23 rnd: 10 sc;
24 rnd: dec, 8 sc (9)
Crochet the additional 3 sc, fold the detail in half and connect the edges by 4 sc. Cut the yarn, leaving a long end enough for sewing.
ARMS –
Begin with a white thread.
Crochet 3 fingers according to the scheme:
1 rnd: 6 sc in MR;
2 rnd: 6 sc.
Cut the yarn, fasten off.
Crochet the last finger the same way, don’t cut
the yarn.
Join the fingers.
1 rnd: 3 sc on the first finger, 3 sc on the second finger, 6 sc on the third finger, 3 sc on
the second finger, 3 sc on the first finger (18);
2 rnd: 18 sc;
3 rnd: (left arm) – 1 sc, 2 sc on the 4th finger from the inside, 15 sc (18);
(right arm) – 6 sc, 2 sc on the 4th finger from the inside, 10 sc (18);
4 rnd: (left arm) – 1 sc, 4 sc on the free loops of the 4th finger, 15 sc (20);
(right arm) – 6 sc, 4 sc on the free loops of the 4th finger, 10 sc (20);
5 rnd: (left arm) – 1 sc, 2 dec, 15 sc (18);
(right arm) – 6 sc, 2 dec, 10 sc (18);
6 rnd: (1 sc, dec)*6 (12);
Change the yarn to the l.b. color.
7 rnd: 12 sc;
8 rnd: for the bk lp 12 sc;
Change the yarn to the wh.color.
9-10 rnd: 12 sc;
Change the yarn to the l.b. color.
11-12 rnd: 12 sc;
Change the yarn to the wh.color.
13-14 rnd: 12 sc;
Change the yarn to the l.b. color.
15-16 rnd: 12 sc;
Change the yarn to the wh.color.
17-18 rnd: 12 sc;
Change the yarn to the l.b. color.
19-20 rnd: 12 sc;
Change the yarn to the wh.color.
21-22 rnd: 12 sc;
Change the yarn to the l.b. color.
23-24 rnd: 12 sc;
Change the yarn to the wh.color.
25 rnd: 12 sc;
26 rnd: 6 dec.
Tighten the opening, hide the end of the thread inside the detail.
Attach the light blue yarn to the last front loop and crochet around:
1 rnd: (3 sc, inc)*3 (15).
Cut the yarn, fasten off.
HEAD
1 rnd: 6 sc in MR;
2 rnd: 6 inc (12);
3 rnd: (1 sc, inc)*6 (18);
4 rnd: 1 sc, inc, (2 sc, inc)*5, 2 sc (24);
5 rnd: (3 sc, inc)*6 (30);
6 rnd: 2 sc, inc, (4 sc, inc)*5, 4 sc (36);
7 rnd: (5 sc, inc)*6 (42);
8 rnd: 3 sc, inc, (6 sc, inc)*5, 3 sc (48);
9 rnd: 48 sc;
10 rnd: (7 sc, inc)*6 (54);
11 rnd: 54 sc;
12 rnd: 4 sc, inc, (8 sc, inc)*5, 4 sc (60);
13 rnd: (9 sc, inc)*6 (66);
14 rnd: 5 sc, inc, (10 sc, inc)*5, 5 sc (72);
15 rnd: 72 sc;
16 rnd: (11 sc, inc)*6 (78);
17 rnd: 78 sc;
18 rnd: 6 sc, inc, (12 sc, inc)*5, 6 sc (84);
If you want to insert the eyes with stalks, it’s
time to insert them. I recommend to insert
them between the 17 and 18 rows, the space
between them is 11 sc.
19 rnd: 84 sc;
20 rnd: 6 sc, dec, (12 sc, dec)*5, 6 sc (78);
21 rnd: (11 sc, dec)*6 (72);
22 rnd: 5 sc, dec, (10 sc, dec)*5, 5 sc (66);
23 rnd: (9 sc, dec)*6 (60);
24 rnd: 4 sc, dec, (8 sc, dec)*5, 4 sc (54);
25 rnd: (7 sc, dec)*6 (48);
26 rnd: 3 sc, dec, (6 sc, dec)*5, 3 sc (42);
27 rnd: (5 sc, dec)*6 (36);
28 rnd: 2 sc, dec, (4 sc, dec)*5, 2 sc (30);
29 rnd: (3 sc, dec)*6 (24);
30 rnd: 1 sc, dec, (2 sc, dec)*5, 1 sc (18).
Cut the yarn, fasten off, hide the end of the
thread inside the detail.
EARS
Make two details. Don’t stuff.
1 rnd: 4 sc in MR;
2 rnd: 4 inc (8);
3 rnd: (1 sc, inc)*4 (12);
4 rnd: (1 sc, inc)*6 (18);
5 rnd: 1 sc, inc, (2 sc, inc)*5, 1 sc(24);
6 rnd: 24 sc;
7 rnd: (3 sc, inc)*6 (30);
8-9 rnd: 30 sc.
Fold the detail in half and connect the edges
by 15 sc. Cut the yarn, leaving a long end
enough for sewing.
– MUZZLE
Crochet with a white yarn.
1 rnd: 6 sc in MR;
2 rnd: 6 inc (12);
3 rnd: 3 inc, 3 sc, 3 inc, 3 sc (18);
4 rnd: (1 sc, inc)*3, 3 sc, (1 sc, inc)*3, 3 sc (24):
5 rnd: (2 sc, inc)*3, 3 sc, (2 sc, inc)*3, 3 sc (30);
6 rnd: 30 sc.
Cut the yarn, leaving a long end enough for sewing.
ASSEMBLY
I propose to strengthen the neck of the cat
with cotton buds, so as the head does not dangle
because of its heaviness. To do this, take 7-8 cotton buds and wrap them with adhesive plaster.
Insert the resulting structure half into the head,
insert the second half into the body. Sew the head
to the body. In the course of sewing stuff all free
space of the head and neck very tight.
Try on the muzzle to the head with the help of pins, begin sewing, stuff in the course of sewing.
Now similarly try on the ears to the head with the help of pins and sew them. Embroider the nose with black thread as it is shown at the photo. After that take out the thread in the
lower point of the nose (point 1), insert in the parallel point at the bottom of the muzzle (point 2), at the same
time slightly tightening the muzzle. Embroider freckles with the same thread. Fasten off and cut the yarn.
Make the tightening for the eyes. To do this mark the points 1 and 2 between the 17 and 18 rows, the
space between them is 9 sc and the points 3 and 4 between the 18 and 19 rows directly under the points 1 and
2 (as it is shown at the photo).
Now insert a needle in the head, fasten off a thread and take it out in the point 1, then insert in the
head in the point 3 and take out in the point 2, tighten a thread.
Again insert a needle in the head in the point 4 and take it out in the point 1, tighten a thread. Repeat
this action 2-3 times, fasten off, cut a thread and hide inside the head.
For those, who inserted the eyes with stalks the principle of tightening is the same. You insert a thread
near the eye according to the same principle.
The next step is gluing the eyes with the help of a glue gun. Then I embroider the eyelids, brows,
whiskers and a highlight on the nose.
It remains to sew the tail. Similarly try on it to the body with the help of pins and sew
Now attach the arms. I offer to attach them with the help of buttons. Make the fastening with double
thread!
To do this insert a needle between the 42 and 43 rows of the body, leaving a small end, and take out
at the opposite side at the same level. Then insert a needle in the arm between the 23 and 24 rows, fasten a
button. Now insert a needle again in the body between the 42 and 43 rows, in the very same place, from
where a thread went out and take it out at the opposite side of the body in the beginning point. Take the end,
which we’ve left in the beginning, tighten and make a strong knot.
Make the same procedure for the second arm. Pierce it between the 23 and 24 rows, fasten a button
and tighten a thread, make a strong knot. Hide the ends of the threads inside the body.
SCARF –
Work with a blue yarn. Make chain of 100 ch and
according to the scheme:
1-2 rnd: 1 ch, 100 hdc.
Cut the yarn, fasten off. Decorate the edges of the
scarf with fringe.