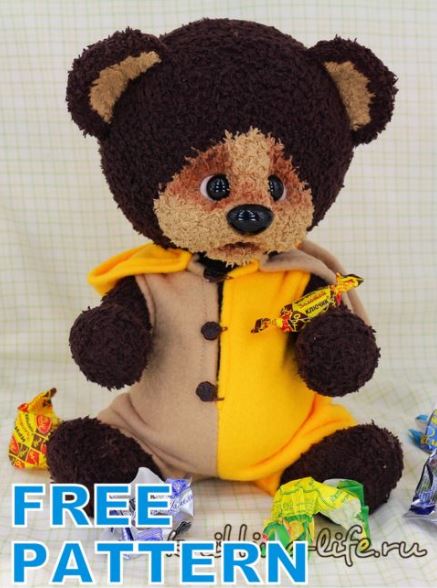
Amigurumi Teddy Bear Free Crochet Pattern With Velvet Rope
You will need:
1. “Kuzya Klubochkin” from Color City (15% cotton, 85% polyamide, 95 m / 50 g) color No. 35 (chocolate) – 4 skeins, color No. 25 (sand) – 1 skein.
2. Hook number 3.
3. Filler (holofiber).
4. Optionally – 1.5 mm cross-sectional copper wire for reinforcing the upper legs.
5. Cotter pins and discs, I have 25 mm discs for the lower legs, 22 mm for the upper and 35 mm for the head. You can use any other way of fastening familiar to you.
6. A piece of fleece for overalls – 50×50 cm, two colors can be used, then the size of the segment is divided in half.
7. 3 small buttons for overalls.
8. A small piece of white felt for eye proteins.
9. The nose and eyes, size, color and shape, choose at your discretion – this will determine the nature of your toy.
10. At will – a dry pastel for tinting, you can tint in any other way familiar to you.
Using these materials, the bear is 30 cm tall.
Abbreviations:
sc – single crochet
dec – decrease (2 sc knit together)
inc – increase (knit 2 sc from one)
sl-st – slip-stitch
ch – chain
A digression for beginners, we knit correctly (open to view the text)
Hidden text
The toy is knitted in a spiral, without connecting posts and lifting loops.
Front side of the part:
Wrong side of the part:
The description of the knitting of this toy is based on the fact that the beginning of the row throughout the knitting of the whole part does not shift and passes in a straight line, but since we knit in a spiral, without lifting loops and a connecting column, the beginning of the row will shift to the right, so every 4- 5 rows need to be knitted at the end of the row an additional column of displacement, so that the beginning of the row was again in the same place. These additional columns in the description of the series are not taken into account.
Thanks to this way of presenting the description, you will always know exactly where you should get the increase or decrease, and the elbow / knee will always be exactly where they should be. The offset of the beginning of the row when knitting in a spiral can differ for different yarns and for different density of knitting, therefore aligning the marker makes the description universal – from any yarn, in any hands you get exactly the kind of detail that it should be.
Upper legs
The beginning marker of the row runs in the middle of the outside of the foot. Knit in the main color.
1 row: 2 ch, in the first loop 6 sc (6)
2 row: inc x 6 (12)
3 row: (inc, sc) x 6 (18)
4 row: (5 sc, inc) x 3 (21)
5-8 rows (4 rows): 21 sc (21)
9 row: 8 sc, dec, sc, dec, 8 sc (19)
10 row: 7 sc, dec, sc, dec, 7 sc (17)
11 row: 8 sc, dec, 7 sc (16)
12-20 rows (9 rows): 16 sc (16)
We fill with the filler, one row below, 4 loops from the marker to the right (for the left foot) or left (for the right foot), insert the cotter pin. You can insert a wire into the foot.
21 row: (2 sc, dec) x 4 (12)
22 row: dec x 6 (6)
We fix the thread, cut it, hide the tip. We knit the second foot in the same way.
Lower paws
The beginning marker of the row runs through the middle of the heel. Knit in the main color.
1 row: 7 ch, from the 2nd loop from the hook: inc, 4 sc, 4 sc to the last, on the other side of the chain: 4 sc, inc (16)
2 row: inc x 2, 4 sc, inc x 4, 4 sc, inc x 2 (24)
3 row: 2 sc, inc, 6 sc, inc, 4 sc, inc, 6 sc, inc, 2 sc (28)
4 row: 3 sc, inc, 6 sc, inc, 6 sc, inc, 6 sc, inc, 3 sc (32)
5-6 rows (2 rows): 32 sc (32)
7 row: 3 sc, dec, 6 sc, dec, 2 sc, dec, 2 sc, dec, 6 sc, dec, 3 sc (27)
8 row: 8 sc, dec, 2 sc, 3 sc together, 2 sc, dec, 8 sc (23)
9 row: 6 sc, dec, 2 sc, 3 sc together, 2 sc, dec, 6 sc (19)
10-11 rows (2 rows): 19 sc (19)
12 row: 9 sc, inc, 9 sc (20)
13 row: 9 sc, inc x 2, 9 sc (22)
14-15 rows (2 rows): 22 sc (22)
16 row: 8 sc, dec, 2 sc, dec, 8 sc (20)
17 row: 7 sc, dec, 2 sc, dec, 7 sc (18)
18 row: 2 sc, dec, 4 sc, dec, 4 sc, dec, 2 sc (15)
We fill with the filler, one row below, 4 loops from the marker to the right (for the left foot) or left (for the right foot), insert the cotter pin.
19 row: (3 sc, dec) x 3 (12)
20 row: dec x 6 (6)
We fix the thread, cut it, hide the tip. We knit the second foot in the same way.
Body
The marker of the beginning of the row runs in the middle of the back. Knit in the main color.
1 row: 2 ch, in the first loop 6 sc (6)
2 row: inc x 6 (12)
3 row: (inc, sc) x 6 (18)
4 row: sc, inc, (2 sc, inc) x 5, sc (24)
5 row: (3 sc, inc) x 6 (30)
6 row: 2 sc, inc, (4 sc, inc) x 5, 2 sc (36)
7 row: (5 sc, inc) x 6 (42)
8 row: 3 sc, inc, (6 sc, inc) x 5, 3 sc (48)
9 row: (7 sc, inc) x 6 (54)
10 row: 4 sc, inc, (8 sc, inc) x 5, 4 sc (60)
11-17 rows (7 rows): 60 sc (60)
We insert the cotter pins of the lower legs approximately between the 8th and 9th rows, closer to the marker so that the tummy is larger than the back. Before spinning the cotter pins, we check the teddy bear for stability and perseverance, if necessary, adjust the position of the legs and only then twist the cotter pins.
18 row: 20 sc, dec, (4 sc, dec) x 3, 20 sc (56)
19 row: 56 sc (56)
20 row: 24 sc, dec, 4 sc, dec, 24 sc (54)
21 row: 54 sc (54)
22 row: 2 sc, dec, 3 sc, dec, 36 sc, dec, 3 sc, dec, 2 sc (50)
23 row: 50 sc (50)
24 row: 3 sc, dec, 15 sc, dec, 6 sc, dec, 15 sc, dec, 3 sc (46)
25 row: 46 sc (46)
26 row: 3 sc, dec, 14 sc, dec, 4 sc, dec, 14 sc, dec, 3 sc (42)
27-30 rows (4 rows): 42 sc (42)
Fasten the upper legs between the 25th and 26th rows, about 10 loops from the marker left and right.
31 row: (5 sc, dec) x 6 (36)
32 row: 2 sc, dec, (4 sc, dec) x 5, 2 sc (30)
33 row: (3 sc, dec) x 6 (24)
We fill up to the end. We insert the cotter pin for fastening with the head.
34 row: sc, dec, (2 sc, dec) x 5, sc (18)
35 row: (sc, dec) x 6 (12)
36 row: dec x 6 (6)
We fix the thread, cut it off.
Head
A marker at the beginning of the row runs in the middle of the nose. We start knitting with a sand-colored thread.
1 row: 2 ch, in the first loop 5 sc (5)
2 row: (3 sc in one) x 5 (15)
3 row: sc, 3 sc in one, 2 sc, 3 sc in one, 2 sc, inc, 2 sc, 3 sc in one, 2 sc, 3 sc in one, sc (24)
4 row: 2 sc, 3 sc in one, 3 sc, inc, 3 sc in one, inc, 6 sc, inc, 3 sc in one, inc, 3 sc, 3 sc in one, 2 sc (36)
5 row: 2 sc, inc, 5 sc, inc, sc, inc, sc, inc, 10 sc, inc, sc, inc, sc, inc, 5 sc, inc, 2 sc (44)
6-8 rows (3 rows): 44 sc (44)
9 row: 9 sc, dec, 4 sc, dec, 10 sc, dec, 4 sc, dec, 9 sc (40)
Change the thread to the main one.
10 row: 2 sc, inc, (4 sc, inc) x 7, 2 sc (48)
11 row: (7 sc, inc) x 6 (54)
12 row: 4 sc, inc, (8 sc, inc) x 5, 4 sc (60)
13 row: 4 sc, (inc, 9 sc) x 2, inc, 10 sc, inc, (9 sc, inc) x 2, 4 sc (66)
14 row: 4 sc, (inc, 10 sc) x 2, inc, 12 sc, inc, (10 sc, inc) x 2, 4 sc (72)
15 row: 4 sc, (inc, 11 sc) x 2, inc, 14 sc, inc, (11 sc, inc) x 2, 4 sc (78)
16 row: 4 sc, (inc, 11 sc) x 2, inc, 20 sc, inc, (11 sc, inc) x 2, 4 sc (84)
17-24 rows (8 rows): 84 sc (84)
25 row: 6 sc, dec, (12 sc, dec) x 5, 6 sc (78)
26 row: 68 sc (78)
27 row: (11 sc, dec) x 6 (72)
28 row: 72 sc (72)
29 row: 5 sc, dec, (10 sc, dec) x 5, 5 sc (66)
30 row: (9 sc, dec) x 6 (60)
310 row: 4 sc, dec, (8 sc, dec) x 5, 4 sc (54)
32 row: (7 sc, dec) x 6 (48)
33 row: 3 sc, dec, (6 sc, dec) x 5, 3 sc (42)
We insert the forelock of the body approximately between the 15th and 16th rows of the head, on the side opposite from the marker. Twist the cotter pin.
34 row: (5 sc, dec) x 6 (36)
35 row: 2 sc, dec, (4 sc, dec) x 5, 2 sc (30)
We fill the head with filler.
36 row: (3 sc, dec) x 6 (24)
37 row: sc, dec, (2 sc, dec) x 5, sc (18)
38 row: (sc, dec) x 6 (12)
39 row: dec x 6 (6)
We fix the thread, cut it off.
Underlip
Knit with a sand-colored thread.
1 row: 2 ch, in the first loop: 5 sc (5)
2 row: ch, turn, (inc, sc) x 2, inc (8)
3 row: ch, turn, 8 sc (8)
We cut the thread, fix it.
Ears
For each eye we knit two identical parts – one sand-colored, the second – the main one, we do not cut the thread from the second part.
1 row: 2 ch, in the first loop: 5 sc (5)
2 row: ch, turn, (inc, sc) x 2, inc (8)
3 row: ch, turn, (2 sc, inc) x 2, 2 sc (10)
4 row: ch, turn, 4 sc, inc x 2, 4 sc (12)
5 row: ch, turn, inc, 4 sc, inc, 5 sc, inc (15)
6 row: ch, turn, 3 sc, inc, 7 sc, inc, 3 sc (17)
We cut the thread, fix it. We knit the same detail of the main color, apply the sand color part and knit 17 sc, capturing both fabrics. We cut the thread, fix it. We knit the second eye in the same way.
Decor
On the muzzle of the teddy bear, we approximately outline the points of the hooks for the eyes and mouth. Insert the needle into the point of tightening the mouth and bring to the point of the right eye. We retreat the column, insert the needle, withdraw at the point of the mouth, tighten. Repeat the tightening several times, pulling the thread. Similarly, we tighten the left eye, at the end we tie the thread to a strong knot. Sew on the lower lip.
Cut out circles of white felt for the pupils. You can toned the eye sockets and mouth. Glue the felt, fasten the eyes and nose. Sew on the ears in any position you like.
Our teddy bear is ready! Let’s sew him a soft jumpsuit!
Overalls
If the size of your teddy bear coincides with mine (height 30 cm), then just print the pattern 1: 1 (open the image with the pattern, click the “Full size” button at the bottom left, save the image and print it). If your teddy bear is bigger or smaller, then increase / decrease the pattern directly on the monitor, adjusting it to the size you need (you can navigate by the height of the jumpsuit and its maximum width). Redraw the pattern on paper and cut it out.
Transfer the patterns to the fabric. I recommend that you first sew a jumpsuit from any unnecessary fabric that you do not mind throwing away. You can quickly stitch the details with a notched seam and try on. After trying on, you will immediately see which places on the pattern you may need to correct.
So, we transfer the patterns to the fleece. We cut, but not along the contoured contour, but by making allowances for the seams. If you will sew on a typewriter – it is better to leave an allowance of 1 cm (then you can cut the excess fabric), if you sew manually – 5 mm is enough.
You should get 4 parts for overalls and 2 parts for the hood.
We sew the side seams of the overalls, the inner seams of the legs, the seam of the back and front. The front seam is not completely stitched, to the place where the legs begin to narrow. Sew two halves of the hood, bend the edge. We also bend the edges of the legs, armhole and the undersized part of the front. Sew in the hood. Sew on buttons, in any way convenient for you, make loops (I just knitted a chain from ch). Dress up the jumpsuit for the little bear.
That’s all, our baby is ready!
If you have any questions in the process of knitting or sewing, please feel free to ask in the comments, I will try to help! Enjoy knitting