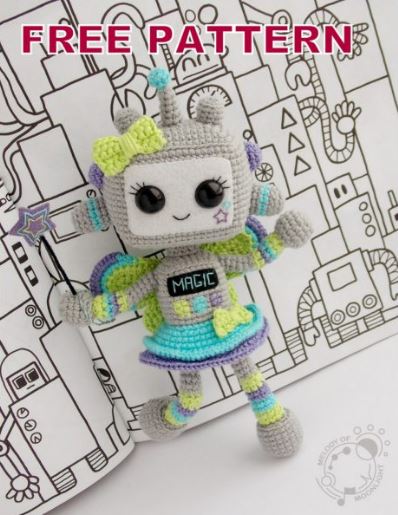
Amigurumi Robot Free Pattern
Materials and tools:
yarn of four colors: gray, light green, turquoise,
lilac;
a suitable size hook;
stuff for stuffing;
scissors;
needle for stitching;
eyes: buttons, beads, special plastic eyes
for toys;
something to decorate: buttons, beads, beads, etc .;
felt for face design and other details (according
desire);
wire for the frame (optional).
Abbreviations:
ch. – chain;
sc – single crochet;
hsc – half single crochet;
hdc – half double crochet;
sl-st – slip stitch;
BLO (back loops only) – knit for the back half loop;
FLO (front loops only) – knit for the front half loop;
inc – increase (2 columns in one loop);
‘‘ inc ’’ – double increase (3 columns in one loop);
dec – decrease (2 columns knitted together);
‘‘ dec ’’ – double decrease (3 columns tied together);
PATTERN
Head
Knit with gray yarn.
7 + 1 ch., Start in the second loop from the hook.
1 row – 6 sc, 3 sc in one loop, turn and continue
knitting on the other side of the chain: 5 sc, inc (16)
2nd row – * ’‘ inc ’’, 5 sc, ‘‘ inc ’’, 1 sc * rep. 2 times (24)
3 row – * 1 sc, ‘‘ inc ’’, 7 sc, ‘‘ inc ’’, 2 sc * rep. 2 times (32)
4th row – * 2 sc, ‘‘ inc ’’, 9 sc, ‘‘ inc ’’, 3 sc * rep. 2 times (40)
5 row – * 3 sc, ‘‘ inc ’’, 11 sc, ‘‘ inc ’’, 4 sc * rep. 2 times (48)
6th row – * 4 sc, ‘‘ inc ’’, 13 sc, ‘‘ inc ’’, 5 sc * rep. 2 times (56)
7 row – * 5 sc, ‘‘ inc ’’, 15 sc, ‘‘ inc ’’, 6 sc * rep. 2 times (64)
8 row – BLO: 64 sc
9-21 rows – 64 sc (13 rows)
22 row – BLO: * 5 sc, ‘‘ dec ’’, 15 sc, ‘‘ dec ’’, 6 sc * rep. 2 times (56)
23 row – * 4 sc, ‘‘ dec ’’, 13 sc, ‘‘ dec ’’, 5 sc * rep. 2 times (48)
24 row – * 3 sc, ‘‘ dec ’’, 11 sc, ‘‘ dec ’’, 4 sc * rep. 2 times (40)
25 row – * 2 sc, ‘‘ dec ’’, 9 sc, ‘‘ dec ’’, 3 sc * rep. 2 times (32)
Insert eyes (if necessary). Start typing.
26th row – * 1 sc, ‘‘ dec ’’, 7 sc, ‘‘ dec ’’, 2 sc * rep. 2 times (24)
27 row – * ’‘ dec ’’, 5 sc, ‘‘ dec ’’, 1 sc * rep. 2 times (16)
28 row – 1 hsc, * 5 sc, ‘‘ dec ’’ * rep. 2 times
Fasten and cut the thread, leaving a long end for
stitching holes.
If you cannot get an even box, you can
finish knitting on the 21st row, and knit the “bottom”
separately (1-7 row) and then sew.
Gizmos on the head
Antenna (1 pc.)
Start knitting with turquoise yarn.
1 row – 6 sc into magic ring (6)
2 row – * inc, 1 sc * rep. 3 times (9)
Gently stuff.
3 row – * dec, 1 sc * rep. 3 times (6)
Next, knit with gray yarn.
4th row – FLO: 6 sc
5-6 row – 6 sc
7 row – inc, 5 sc (7)
8 row – 3 sc, inc, 3 sc (8)
9 row – 7 sc, inc (9)
Fasten and cut the thread, leaving a long end for
sewing on.
Part 1 (2 pcs.)
Start knitting with gray yarn.
1 row – 6 sc into magic ring (6)
2 row – * inc * rep. 6 times (12)
3 row – BLO: 12 sc
4 row – 12 sc
Next, knit with turquoise yarn.
5 row – 12 sc
Next, knit with gray yarn.
6-7 row – 12 sc
Fasten and cut the thread, leaving a long end for
sewing on.
Part 2 (2 pcs.)
Knit with lilac yarn.
1 row – 6 sc into magic ring (6)
2 row – * inc * rep. 6 times (12)
3 row – 12 sc
Fasten and cut the thread, leaving a long end for
sewing on.
Part 3 (2 pcs.)
Knit with gray yarn.
1 row – 5 sc into magic ring (5)
2 row – * inc * rep. 5 times (10)
3 row – BLO: 10 sc
4-5 row – 10 sc
Fasten and cut the thread, leaving a long end for
sewing on.
Torso
Start knitting with gray yarn.
Rows to close. We knit the first column in the same
loop as the connecting column of the previous row!
1 row – 6 sc in amigurumi ring, sl-st (6)
2 row – 1 ch., 1 sc, * inc * rep. 5 times, sl-st (11)
3 row – 1 ch., BLO: 11 sc, sl-st
4 row – 1 ch., 11 sc, sl-st
5 row – 1 ch., FLO: 1 sc, ‘‘ inc ’’, * 2 sc, ‘‘ inc ’’ * rep. 3 times, sl-st
(nineteen)
6 row – 1 ch., 2 sc, ‘‘ inc ’’, * 4sc, ‘‘ inc ’’ * rep. 3 times, 1 sc,
sl-st (27)
7 row – 1 ch., 3 sc, ‘‘ inc ’’, * 6 sc, ‘‘ inc ’’ * rep. 3 times, 2 sc, sl-st (35)
8 row – 1 ch., BLO: 35 sc, sl-st
9-12 row – 1 ch., 35 sc, sl-st (4 rows)
13-14 row – 1 ch., 13 sc, 2 sc light green, 1 sc gray, 2 sc turquoise, 1 sc gray color, 2 sc purple, 14 sc gray, sl-st (35)
15-16 row – 1 ch., 35 sc, sl-st
17th row – 1 ch., BLO: 2 sc, ‘‘ dec ’’, * 6 sc, ‘‘ dec ’’ * rep. 3 times, 3 sc, sl-st (27)
18 row – 1 ch., 1 sc, ‘‘ dec ’’, * 4 sc, ‘‘ dec ’’ * rep. 3 times, 2 sc, sl-st
(nineteen)
Start typing.
19 row – 1 ch., ‘‘ Dec ’’, * 2 sc, ‘‘ dec ’’ * rep. 3 times, 1 sc (11)
20 row – 1 ch., * Dec * rep. 6 times (6)
Fasten and cut the thread. Hide the tip.
If you can’t get a smooth kdec, you can finish
knitting on the 16th row, and “bottom” knit separately (for
below) and then sew.
Scheme for the bottom kdeca:
1 row – 6 sc in amigurumi ring, sl-st (6)
2 row – 1 ch., 1 sc, * inc * rep. 5 times, sl-st (11)
3 row – 1 ch., 1 sc, ‘‘ inc ’’, * 2 sc, ‘‘ inc ’’ * rep. 3 times, sl-st (19)
4th row – 1 ch., 2 sc, ‘‘ inc ’’, * 4sc, ‘‘ inc ’’ * rep. 3 times, 1 sc,
sl-st (27)
5 row – 1 ch., 3 sc, ‘‘ inc ’’, * 6 sc, ‘‘ inc ’’ * rep. 3 times, 2 sc,
sl-st (35)
Fasten and cut the thread, leaving a long end for
sewing on.
Skirt
We work with the torso.
We start knitting with turquoise yarn.
Between rows 16 and 17 we still have a half-loop strip. TO
this strip at the back (where the “seam” of the connecting posts)
attach the thread and knit into these half-loops, no longer locking
ranks.
1 row – 36 sc
2 row – * 3 sc, inc * repeat 9 times (45)
3 row – 45 sc
4th row – * 4 sc, inc * repeat 9 times (54)
5 row – 54 sc
6 row – FLO: * 2 sc, inc * repeat 18 times (72)
Fasten and cut the thread. Hide the tip.
We attach the thread of lilac color to the back half loops
between rows 5 and 6.
6 ‘row – BLO: 54 sc
7 ‘row – * 1 hdc, 2 hdc in one loop * repeat 27 times (81)
Fasten and cut the thread. Hide the tip.
Hands
Part 1 (2 pcs.)
Start knitting with light green yarn.
8 ch. to close in a ring.
1 row – 8 sc
Next, knit with turquoise yarn.
2 row – 8 sc
Next, knit yarn of lilac color.
3 row – 8 sc
Next, knit with light green yarn.
4 row – dec, 6 sc (7)
Next, knit with gray yarn.
5 row – BLO: 7 sc
6-10 row – 7 sc (5 rows)
Fasten and cut the thread, leaving a long end for
sewing on.
Part 2 (2 pcs.)
Knit with gray yarn.
1 row – 5 sc into magic ring (5)
2 row – * inc * rep. 5 times (10)
3 row – * 1 sc, inc * rep. 5 times (15)
4-6 row – 15 sc (3 rows)
7 row – * 1 sc, dec * rep. 5 times (10)
To fill.
8 row – * dec * rep. 5 times (5)
Fasten and cut the thread. Hide the tip.
Legs
Part 1 (2 pcs.)
Start knitting with light green yarn.
10 ch. to close in a ring.
1 row – 10 sc
2 row – dec, 8 sc (9)
Next, knit with turquoise yarn.
3-4 row – 9 sc
Next, knit yarn of lilac color.
5-6 row – 9 sc
Next, knit with light green yarn.
7 row – dec, 7 sc (8)
8 row – 8 sc
Next, knit with gray yarn.
9 row – BLO: 8 sc
10-18 row – 8 sc (9 rows)
Fasten and cut the thread, leaving a long end for
sewing on.
Part 2 (2 pcs.)
Knit with gray yarn.
Rows to close. We knit the first column in the same
loop as the connecting column of the previous row!
1 row – 6 sc in amigurumi ring, sl-st (6)
2 row – 1 ch., 1 sc, * inc * rep. 5 times, sl-st (11)
3 row – 1 ch., 1 sc, ‘‘ inc ’’, * 2 sc, ‘‘ inc ’’ * rep. 3 times, sl-st (19)
4 row – 1 ch., BLO: 19 sc, sl-st (19)
5-9 row – 1 ch., 19 sc, sl-st (5 rows)
10 row – 1 ch., BLO: 1 sc, ‘‘ dec ’’, * 2 sc, ‘‘ dec ’’ * rep. 3 times, sl-st (11)
To fill.
11 row – 1 ch., * ’‘ Dec ’’ * rep. 4 times, sl-st (4)
Fasten and cut the thread. Hide the tip.
Wings
Part 1 (2 pcs.)
Knit with light green yarn.
6 + 1 ch., Start in the second loop from the hook.
1 row – 4 sc, 1 hdc, 4 hdc in one loop; turn and
continue knitting on the other side of the chain: 1 hdc, 4 sc (14)
Turn the part inside out to itself, as when knitting
rotary rows.
2 row – 1 ch., 4 sc, 1 hdc, * 2 hdc in one loop * rep. 4 times,
1 hdc, 4 sc (18)
Fasten and cut the thread, leaving a long end for
sewing on.
Part 2 (2 pcs.)
Start knitting with light green yarn.
10 + 1 ch., Start in the second loop from the hook.
1 row – 6 sc, 3 hdc, 4 hdc in one loop; turn and continue knitting on the other side of the chain: 3 hdc, 6 sc (22)
Turn the part inside out towards you and then knit rotary rows.
2 row – 1 ch., 4 hsc, 3 sc, 2 hdc, * 2 hdc in one loop * rep. 4 times, 2 hdc, 3 sc, 4 hsc, rotate (26)
3 row – 1 ch., 8 hsc; further in turquoise color: 1 sc, * inc * rep. 8 times, 1 sc; further light green: 8 hsc, rotate (34)
4 row – 1 ch., 8 hsc; further in turquoise color: 3 hsc; Further
purple: * inc, 1 sc * repeat 6 times; Further
turquoise color: 3 hsc (32 + 8 untied)
Fasten and cut the threads. Tips neatly hide
inside the columns so that they are not visible with any
side.
Bows (1 + 1 pcs.)
Knit with yarn of green color, in rotary rows.
Big:
8 + 1 ch., Start knitting in the second loop from the hook:
1 row – 8 sc, turn,
2-4 row – 1 ch., 8 sc, turn.
Fasten and cut the thread, leaving a long end
Small:
5 + 1 ch., Start knitting in the second loop from the hook:
1 row – 5 sc, turn;
2-3 row – 1 ch., 5 sc, turn.
Fasten and cut the thread, leaving a long end.
The ends of the threads to the center of the parts and tight
wrap, forming a bow.
Assembly
1. The frame. Doing it is optional. Frameless toy
it will turn out “squeezing” – with dangling limbs and
moving head. It’s better to strengthen the neck. So that
ideal skeleton – starting from the head
(you can fix the wire inside with a button,
until the hole is sewn up), then forming hands and
legs.
2. Sew a hole on the bottom of the head. We fix the thread, but not
cut off, with it we sew the head to the body. Face can
draw with felt. We stuff the antenna and other things
sew to the head in random order. If you
It seems that something is superfluous, you can safely decirate. Everything
in your hands.
3. The extremities are formed from “trdec points” and
balls /. For a toy on a frame, it’s better first
Sew “tricots” to the body, lightly fill them, and to them
already sew balls and kdeciki.
4. Sew wings to the back of the body. Big on top
small bottom.
5. Bows are used to decorate the head and skirt.
Buttons on the body can be additionally highlighted
stitches, put a small screen on an empty place above them, or
anything else. Decorate the wings with buttons, beads
or beads. You can make a fairy wand for a fairy.