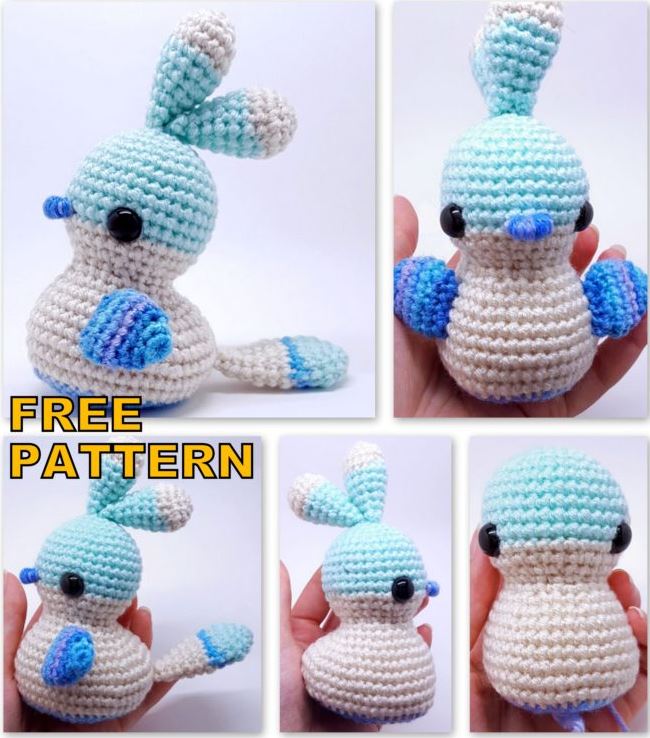
Amigurumi Little Bird Free Crochet Pattern
Tulla is a silly little bird, approximately 5 1/2 in. tall, with big feathers atop her head. Pattern is done in three different colors which allows for many different color combinations.
Supplies:
2.25 mm crochet hook
Worsted weight yarn in three different colors, Main, Accent, 2nd Accent
12mm safety eyes
Yarn needle
Fiber fill
Stitch markers
Abbreviations:
MC = Magic circle
Sc = single crochet
Inc = increase, two sc in same st
Dec = decrease, two sc together
RND = round
Sc rnd = sc in every stitch of the rnd
St = stitch
Ch = chain
Sc rnd = sc in every st of the rnd
CC = Yarn color change
[…] = repeat instructions within brackets as specified.
Techniques:
Magic circle: Essential to the start of most amigurumi, I have a picture tutorial here.
Invisible decrease: Good for preventing gaps and giving a more uniform look to your sc’s. Invisible decrease tutorial.
Working in front lps: For my patterns I always work sc’s in the front loops of the stitch, unless otherwise specified. By working in only the front loops the sc’s will stack up straighter than if you worked them in both loops.
Stitch markers: I use a stitch marker (bobby pin) for keeping track of the beginning of my rounds, I place it in the first stitch of the round.
Staggered rounds: Staggered rounds off set the patterns inc’s or dec’s so you don’t get that pinwheel look and it is more of a circle instead of a hexagon. For example, [4 sc, inc] x6 is an even inc round that can be a staggered round, so it would become, 2 sc, inc, [4 sc, inc] x5, 2 sc, the even sc’s are split at the beginning of the round.
Close: Closing a piece is threading your yarn needle with the yarn end and putting it through each of the front loops of the last rounds’ sc’s, usually 6, and pulling tight. It should look like a mini magic circle, then put the needle through the center of it and out through the piece. Tie your knot and stuff ends back into the piece.
Whip stitch: Usually means the finished piece is folded flat with the last sc or yarn end at the edge of the piece. Thread yarn needle with yarn end, and again with only the front loops, ‘zigzag,’ or whip stitch the opening closed.
Pattern:
Head and body
The pattern starts off with the head which begins with your accent color, rnd 12 is the color change to the main color yarn. Rnd 25 is the second color change which goes to your 2nd accent color. Color change counts as first sc of the rnd and is followed by a sl st.
In accent
RND 1: 6 sc in MC (6 sts)
RND 2: 6 inc (12 sts)
RND 3: [sc, inc] x6 (18 sts)
RND 4: sc, inc [2 sc, inc] x5, sc (24 sts)
RND 5: [3sc, inc] x6 (30 sts)
RND 6: 2sc, inc,[4 sc, inc] x5, 2 sc (36 sts)
RND 7-11: Five sc rnds (36 sts)
RND 12: CC to main color, sl st, 34 sc (36 sts)
RND 13: 2 sc, dec, [4 sc, dec] x5, 2 sc (30 sts)
RND 14: [3 sc, dec] x6 (24 sts)
RND 15: sc, dec, [2 sc, dec] x5, sc (18 sts)
Place eyes between rnds 11 and 12, and about 11 sts apart
RND 16: sc, inc [2 sc, inc] x5, sc (24 sts)
RND 17: [3 sc, inc] x6 (30 sts)
Fully stuff the head.
RND 18: 2sc, inc, [4 sc, inc] x6, 2 sc (36 sts)
RND 19: [sc, inc] x3, 24 sc, [sc, inc] x3 (42 sts)
RND 20: [2 sc, inc] x3, 21 sc, [2 sc, inc] x3 (48 sts)
RND 21: sc rnd (48 sts)
RND 22: [7 sc, inc] x6 (52 sts)
RND 23: sc rnd (52 sts)
RND 24: 3 dec, 36 sc, 3 dec (48 sts)
RND 25: CC to 2nd accent, sl st, 3 sc, dec, [5 sc, dec] x5 (42 sts)
RND 26: [sc, dec] x3, 6 sc, 6 dec, 6sc, [sc, dec] x3 (30 sts)
RND 27: [3 sc, dec] x6 (24 sts)
Begin stuffing the body
RND 28: sc, dec, [2 sc, dec] x5, sc (18 sts)
RND 29: 9 dec (9 sts)
Fully stuff the body and close. Now it will look like the opening is too big to close, but the reason for leaving so many sts at the end is to make sure your bird has a flat bottom.
Beak
Thread 2nd accent color through yarn needle, working between rnds 11 and 12, from one eye count four sc’s to the center of the head and insert needle, run needle behind the next three sc and then pull through. Loop through this span twice, and then begin looping yarn through the ‘stitch,’ keep building it up, focusing more on the center, till it looks like a rounded beak.
Feathers x2
The feathers are in two colors, starting with your main color and switching to your accent at rnd 5.
Start with main
RND 1: 6 sc in MC (6 sts)
RND 2: 6 inc (12 sts)
RND 3: [sc, inc] x6 (18 sts)
RND 4: sc rnd (18 sts)
RND 5: CC to accent, sl st, dec [4 sc, dec] x 2, 2 sc (15 sts)
RND 6: sc rnd (15 sts)
RND 7: [3 sc, dec] x3 (12 sts)
RND 8: sc rnd (12 sts)
RND 9: sc, dec, [2 sc, dec] x2, sc (9 sts)
RND 10: sc rnd
Fully stuff the feathers. Whip stitch the opening closed and attach to first feather to the very top of the head. I usually aim for right above the MC and then attach the second feather directly behind it. The second one I sew on through the MC
Wing x2
Done entirely with your 2nd accent yarn color
In 2nd accent
RND 1: 6 sc in MC (6 sts)
RND 2: [sc, inc] x3 (9 sts)
RND 3: sc, inc, [2 sc, inc] x2, sc (12 sts)
RND 4: [3 sc, inc] x3 (15 sts)
RND 5-6: Two sc rnds (15 sts)
RND 7: [sc, dec] x5 (10 sts)
No need to stuff the wings. Whip stitch opening of wing closed and attach to the body starting at rnd’s 17 and 18, aligning with the start of wing with the eye, and sewing down over the span of four rnds.
Tail Feather
Start with accent
RND 1: 6 sc in MC (6 sts)
RND 2: 6 inc (12 sts)
RND 3: [sc, inc] x6 (18 sts)
RND 4: sc rnd (18 sts)
RND 5: CC to 2nd accent, sl st, dec, [4sc, dec] x2, dec (15 sts)
RND 6: CC to main, sc rnd (15 sts)
RND 7: sc rnd (15 sts)
RND 8: [3 sc, dec] x3 (12 sts)
RND 9: sc rnd (12 sts)
RND 10: sc, dec, [2 sc, dec] x2, sc (9 sts)
RND 11: sc rnd (9 sts)
Tail is not stuffed, but push all the yarn ends in and squish them around till they lay flat. Whip stitch the opening closed and attach the body at the between rnds 22 and 23. I try to align the tail with the top feathers to make it centered.
And your little birdy is complete!!