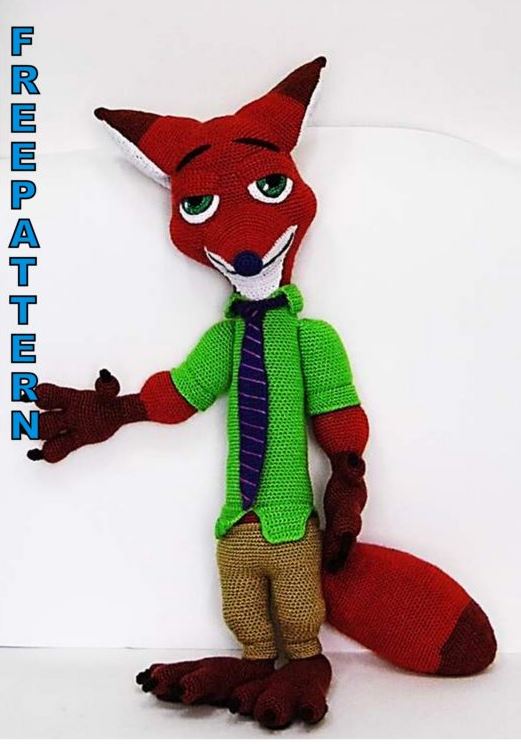
Amigurumi Fox Zootropolis Movie Free Crochet Pattern
MATERIALS
– Wool of different colors: white, black,
light green, green, brown, reddish brown, color
strong tile, violet, fuchsia, beige
– Wool thickness: 3-4 mm.
– Crochet needle appropriate to the thickness of the wool.
– Needle sew wool.
– Synthetic filling.
ABBREVIATIONS
Sc: single crochet
İnc: increase
Dec: decrease
Fill as we weave.
If you have questions about the points you can visit
Tutorial Basic Points for knitting amigurumis
Thank you very much for buying our pattern.
We hope you enjoy knitting it!
If you have any questions about the pattern you can
Character from the movie Zootropolis
LEGS (x2)
Reddish brown
1. Magic ring into 6 sc.
2. İnc at all points (12).
3. “1 sc, inc”, repeat until the end of the
turn (18).
4. AND 5. 1 sc at each point (18).
6. We weave at the top of the
1 sc chains at each point. (18).
We will return to this lap to sew the foot.
7. At 10. 1 sc at each point (18).
11. We change to beige and weave “2
sc, inc ”(24).
12. We weave at the top of the
1 sc chains at each point (24).
We will return to this round to complete the
pants.
13. To 15. 1 sc at each point (24).
16. “3 sc, inc” 3 times, “2 sc, dec” 3
times (24).
17. “4 sc, inc” 3 times, 1 sc in each
point on the rest of the lap (27).
18. “5 sc, inc” 3 times, 1 sc in each
point on the rest of the lap (30).
19. To 22. 1 sc at each point (30).
23. 1 sc, 1 inc, “4 sc, dec” 3 times, “3
sc, inc ”2 times, 2 sc (30).
24. To 30. 1 sc at each point (30).
We topped the first leg, we knit the
second following the same pattern and the
we leave without finishing off to start the union
of the legs:
We put one leg next to the other
placing them in such a way that the knees
go out and your legs are something
arched at the sides. We mark the point
central among them. We knit in the second
leg that we left without finishing 1 sc in each
point until you reach the marked point.
We pass with 1 sc to the first leg.
We knit in it 1 sc at each point until
get back to the marked point, we pass
with 1 sc to the second leg and we complete
the Union.
We close the gap between the legs with the
wool needle We continue weaving the
BODY
1. In total we will have 60 sc.
2. and 3. 1 sc at each point (60).
4. “9 sc, inc”, repeat (66).
5. “10 sc, inc”, repeat (72).
6. To 14. 1 sc at each point (72).
15. “10 sc, dec”, repeat (66).
16. We change to strong tile color and weave
on top of the chains 1 sc in
each point (66). We will return to complete
the pants.
17. 1 sc at each point (66).
18. “9 sc, dec”, repeat (60).
19. AND 20. 1 sc at each point (60).
21. We change to light green and weave “18
sc, dec ”, repeat (57).
22. We weave at the top of the
1 sc chains at each point (57).
We will return to this round to complete the
shirt.
23. To 25. 1 sc at each point (57).
26. “17 sc, dec”, repeat (54).
27. At 30. 1 sc at each point (54).
31. “16 sc, dec”, repeat (51).
32. At 35. 1 sc at each point (51).
36. “15 sc, dec”, repeat (48).
37. At 40. 1 sc at each point (48).
41. “14 sc, dec”, repeat (45).
42. At 45. 1 sc at each point (45).
46. ”13 sc, dec”, repeat (42).
47. At 65. 1 sc at each point (42).
66. “12 sc, dec”, repeat (39).
67. At 75. 1 sc at each point (39).
76. “11 sc, dec”, repeat (36).
77. We change to the color strong tile and weave
on top of the chains 1 sc in
each point (36). We will return to this round
to complete the shirt collar.
78. At 83. 1 sc at each point (36).
84. “11 sc, inc”, repeat (39).
85. 1 sc at each point (39).
86. “12 sc, inc”, repeat (42).
87. “13 sc, inc”, repeat (45).
88. “14 sc, inc”, repeat (48).
89. “15 sc, inc”, repeat (51).
90. “16 sc, inc”, repeat (54).
91. 1 sc at each point (54).
We row.
WE COMPLETE THE PANTS
Bottoms of the Pant (x2):
In beige
1. We start from lap 12 of the legs and
with the doll’s feet up, we knit
in the part of the chains that we set free
1 sc at each point (24).
2. At 5. 1 sc at each point (24).
We row.
Waist:
In beige
1. We start from lap 16 of the body and with
the doll’s feet down, we knit in
the part of the chains that we set free 1
sc at each point (66).
2. 1 sc at each point (66).
We row.
WE COMPLETE THE SHIRT
Waist:
Light green
We divide it into 3 parts:
• 1 Rear.
• 2 Front
Let’s start weaving the Back:
1. We mark the center point from behind and
we count 13 sc to the side and 12 sc to
the other, to get well along with the point
marked, a segment of 26 sc in total
(we mark the start and end sc).
We hook at the point marked the
left to, with the doll’s feet towards
above, knit to the left 26 sc (26).
2. To 10. No separation chain before
turn, we will lose in each row 1 sc.
We will have 17 sc.
We row.
Right Front:
1. We leave 1 sc of separation with respect
to the sc marked and we hook to knit with
the doll’s feet up 14 sc (14).
2. AND 3. Without separation chain before
turn, we will lose 1 sc in each row (13) and (12).
4. Separation chain, we spin and weave
1 sc at each point (12).
5. Without separation chain, we lose 1 sc
(eleven).
6. Separation chain, we spin and weave
1 sc at each point (11).
7. Without separation chain, we lose 1 sc
(10)
8. Separation chain, we spin and weave
1 sc at each point (10).
9. Without separation chain, we lose 1 sc
(9).
10. Separation chain, we spin and weave
1 sc at each point until you reach both
last sc in which we do 1 dec (11).
We row.
Left Front:
1. We leave 1 sc of separation with respect
to the other piece and we hook to weave with
the doll’s feet up 14 sc (14).
2. to 4. No separation chain before
turn, we will lose 1 sc in each row (13), (12) and
(eleven).
5. Separation chain, we spin and weave
1 sc at each point (11).
6. Without separation chain, we lose 1 sc (10).
7. Separation chain, we turn and
we knit 1 sc at each point (10).
8. Without separation chain, we lose 1
sc (9).
9. Separation chain, we turn and
we knit 1 sc at each point (9).
10. Without separation chain, we lose 1
sc (8).
We row.
To finish and give a softened finish to
the edges of the pieces we just
weave, we hook by the back and with
the doll’s feet up,
we border with sc.
SHIRT NECK
Light green
1. We start from lap 77 of the body.
We mark the center point in front that
we will leave without knitting. We hooked on the
left of this point and with the feet of
doll down we weave “6 sc, inc”
5 times (40).
2. To 6. Without separation chain, we turn
and we lose 1 sc in each row. Us
35 sc will remain.
7. Without separation chain, we turn and
we weave around the entire piece with sc
To soften the edges.
8. We continue weaving, now taking
the vertical part of the chains, but only
about the 35 sc that we had left of the
row 6. This will allow us to bend the neck and
knit the lower part.
9. To 15. Separation chain,
we spin and weave 1 sc in each
point (35).
We row.
ARMS (x2)
Thumb:
Reddish brown
1. Magic ring into 6 sc.
2. İnc at all points (12).
3. “1 sc, inc”, repeat (18).
4. At 6. 1 sc at each point (18).
7. “1 sc, dec”, repeat (12).
8. At 10. 1 sc at each point (12).
We row.
Fingers (x3):
Reddish brown
1. Magic ring into 6 sc.
2. İnc at all points (12).
3. “1 sc, inc”, repeat (18).
4. At 8. 1 sc at each point (18).
9. “1 sc, dec”, repeat (12).
10. To 12. 1 sc at each point (12).
We row.
We knit two fingers and finish them,
we leave the third finger unfinished to
Begin finger joining:
1. With 1 sc we pass to another finger,
we knit 5 sc more, we go to the third finger
with 1 sc. We knit 11 more sc and repeat
The same sequence on the other side.
We will have 36 points. (3 fingers x 12 sc).
2. 1 sc at each point (36).
3. “4 sc, dec”, repeat (30).
4. 1 sc at each point (30).
5. “4 sc, inc”, repeat (36).
6. At 10. 1 sc at each point (36).
11. “4 sc, dec”, repeat (30).
12. 1 sc at each point (30).
13. “3 sc, dec”, repeat (24).
14. 1 sc at each point (24).
15. “2 sc, dec”, repeat (18).
16. To 23. 1 sc at each point (18).
24. We change to the color strong tile and
we knit 1 sc at each point (18).
25. “2 sc, inc”, repeat (24).
26. 1 sc at each point (24).
27. “3 sc, inc”, repeat (30).
28. “4 sc, inc”, repeat (36).
29. “5 sc, inc”, repeat (42).
30. At 35. 1 sc at each point (42).
36. We mark the center point at one of
the sides and we count 9 sc to the side
and 8 sc towards each other, to get, together
with the marked point, a segment of
18 sc, on which we weave “1 sc,
dec ”6 times, 1 sc at each point in the
rest of the lap (36).
37. Now the segment has 12 sc and
on them we knit “2 sc, dec” 3 times
(33).
38. The segment already has 9 sc over
we knit “1 sc, dec” 3 times, 1 sc
at each point in the rest of the lap
(30).
39. At 42. 1 sc at each point (30).
43. We change to light green and weave
“4 sc, inc”, repeat (36).
44. We knit at the top of the
1 sc chains at each point (36).
We will return to this round to complete
the sleeve.
45. At 60. 1 sc at each point (36).
61. “4 sc, dec”, repeat (30).
62. “3 sc, dec”, repeat (24).
63. “2 sc, dec”, repeat (18).
64. “1 sc, dec”, repeat (12).
65. Dec on all points (6).
We row. We close the gap with the
wool needle
WE COMPLETE THE SLEEVE
Light green
1. We start from lap 44 of the arm and with
the doll’s hands up we knit
in the part of the chains that we leave
free, 1 sc at each point (36).
2. At 6. 1 sc at each point (36).
We row.
FEET (x2)
Lateral Fingers (x2):
Reddish brown
1. Magic ring into 6 sc.
2. İnc at all points (12).
3. “1 sc, inc”, repeat (18).
4. At 10. 1 sc at each point (18).
We row.
Central Finger:
Reddish brown
1. Magic ring into 6 sc.
2. İnc at all points (12).
3. “1 sc, inc”, repeat (18).
4. “2 sc, inc”, repeat (24).
5. To 12. 1 sc at each point (24).
We row
We leave one of the lateral fingers without
finish off to begin the union of the
fingers:
1. With 1 sc we pass to the middle finger,
we knit 11 more sc, we go to the last
finger with 1 sc. We knit 17 sc more and
we repeat the same sequence for the other
side. We will have 60 points. (2 fingers x
18 sc + 1 finger x 24 sc).
2. “8 sc, dec”, repeat (54).
3. “7 sc, dec”, repeat (48).
4. “6 sc, dec”, repeat (42).
5. “5 sc, dec”, repeat (36).
6. To 20. 1 sc at each point (36).
21. “4 sc, dec”, repeat (30).
22. To 25. 1 sc at each point (30).
26. “3 sc, dec”, repeat (24).
27. And 28. 1 sc at each point (24).
29. “2 sc, dec”, repeat (18).
30. 1 sc at each point (18).
31. “1 sc, dec”, repeat (12).
32. Dec on all points (6).
We row. We close with the needle
wool.
NAILS HANDS AND FEET (x14)
In brown
1. Magic ring into 4 sc.
2. At 4. 1 sc at each point (4).
We row.
FEET PADS
Each foot will have 3 small and 1 large.
Small (x6):
In brown
1. Magic ring into 6 sc.
2. İnc at all points (12).
3. 1 sc at each point (12).
We row.
Large (x2):
In brown
1. Magic ring into 6 sc.
2. “2 inc, 1 sc” 2 times (10).
3. 1 sc, 2 inc, 3 sc, 2 inc, 2 sc (14).
4. 2 sc, 3 inc, 4 sc, 3 inc, 2 sc (20).
5. 1 sc at each point (20).
We row.
We sew the feet to the part we leave
free on lap 6 of the legs.
HEAD
In strong tile color
1. Magic ring into 6 sc.
2. İnc at all points (12).
3. “1 sc, inc”, repeat (18).
4. “2 sc, inc”, repeat (24).
5. “3 sc, inc”, repeat (30).
6. “4 sc, inc”, repeat (36).
7. “5 sc, inc”, repeat (42).
8. “6 sc, inc”, repeat (48).
9. “7 sc, inc”, repeat (54).
10. “8 sc, inc”, repeat (60).
11. “9 sc, inc”, repeat (66).
12. “10 sc, inc”, repeat (72).
13. To 20. 1 sc at each point (72).
21. “11 sc, inc”, repeat (78).
22. AND 23. 1 sc at each point (78).
24. “12 sc, inc”, repeat (84).
25. At 30. 1 sc at each point (84).
31. “1 sc, inc” 6 times, 30 sc, “1 sc,
inc ”6 times, 30 sc (96).
32. “2 sc, inc” 6 times, 30 sc, “2 sc,
inc ”6 times, 30 sc (108).
33. At 40. 1 sc at each point (108).
41. 4 sc, “2 sc, dec” 6 times, 30 sc, “2
sc, dec ”6 times, 1 sc at each point in
the rest of the lap (96).
42. 4 sc, “1 sc, dec” 6 times, 30 sc, “1
sc, dec ”6 times, 1 sc at each point in
The rest of the turn. (84).
43. 1 sc at each point (84).
44. “12 sc, dec”, repeat (78).
45. “11 sc, dec”, repeat (72).
46. ”10 sc, dec”, repeat (66).
47. “9 sc, dec”, repeat (60).
48. “8 sc, dec”, repeat (54).
49. And 50. 1 sc at each point (54).
We row.
SNOUT
In strong tile
1. Magic ring into 6 sc.
2. We will begin to change color
to weave half in tile color and the other
Half blank. İnc at all points
(6 sc in white and 6 sc in tile) (12). In the
next laps we will continue
changing color when appropriate,
following the pattern established in this
return.
3. And 4. 1 sc at each point (12).
5. “2 sc, inc”, repeat (16).
6. 1 sc at each point (16).
7. “3 sc, inc”, repeat (20).
8. “4 sc, inc”, repeat (24).
9. “5 sc, inc”, repeat (28).
10. “6 sc, inc”, repeat (32).
11. “7 sc, inc”, repeat (36).
12. “8 sc, inc”, repeat (40).
13. “9 sc, inc”, repeat (44).
14. “10 sc, inc”, repeat (48).
15. “11 sc, inc”, repeat (52).
16. “12 sc, inc”, repeat (56).
17. “13 sc, inc”, repeat (60).
18. “14 sc, inc”, repeat (64)
19. “15 sc, inc”, repeat (68).
20. “16 sc, inc”, repeat (72).
21. AND 22. 1 sc at each point (72).
We row.
Neck spot:
We are going to weave the stain that from the
snout down the neck. We will do it
weaving on the snout.
The white half of the snout has 36 sc.
We are going to weave on the central 18 sc, it is
say, we leave 9 sc on each side without knitting.
1. We hook onto the fabric, with the
snout tip placed down and
we knit 1 sc at each point over those 18
central sc (18).
2. To 6. No separation chain before
turn and making a dec with the 2
Last sc, we will lose 2 sc in each row.
We will remain 8 sc (8).
7. Separation chain, we turn and
we knit 1 sc at each point (8).
We row.
NOSE
In violet
1. Magic ring into 6 sc.
2. İnc at all points (12).
3. “1 sc, inc”, repeat (18).
4. 12 sc, 3 dec (15).
5. 11 sc, 2 dec (13).
6. 11 sc, 1 dec (12).
7. 1 sc at each point (12).
We row.
The part where we have done the
decreases we must place it towards
above, and we will introduce the tip of the
snout inside the nose.
EARS (x2)
Reddish brown
1. Magic ring into 6 sc.
2. 1 sc at each point (6).
3. “1 sc, inc”, repeat (9).
4. 1 sc at each point (9).
5. “2 sc, inc”, repeat (12).
6. 1 sc at each point (12).
7. “1 sc, inc”, repeat (18).
8. 1 sc at each point (18).
9. “2 sc, inc”, repeat (24).
10. 1 sc at each point (24).
11. “3 sc, inc”, repeat (30).
12. AND 13. 1 sc at each point (30).
14. “4 sc, inc”, repeat (36).
15. AND 16. 1 sc at each point (36).
17. “5 sc, inc”, repeat (42).
18. AND 19. 1 sc at each point (42).
20. “6 sc, inc”, repeat (48).
21. AND 22. 1 sc at each point (48).
23. We change to the color strong tile and
we knit 1 sc at each point (48).
24. “7 sc, inc”, repeat (54).
25. And 26. 1 sc at each point (54).
27. “8 sc, inc”, repeat (60).
28. And 29. 1 sc at each point (60).
30. “9 sc, inc”, repeat (66).
31. And 32. 1 sc at each point (66).
33. “10 sc, inc”, repeat (72).
34. And 35. 1 sc at each point (72).
We row.
Inner part of the ears (x2):
In white
1. 19 chains on which we weave 18
sc.
2. To 4. Separation chain, we turn and
we knit 1 sc at each point (18).
5. Without separation chain before turning
and making a dec with the last 2 sc,
we lose 2 sc (16).
6. AND 7. Separation chain, we turn and
we knit 1 sc at each point (16).
8. Without chain + final dec (14).
9. AND 10. Separation chain, we turn and
we knit 1 sc at each point (14).
11. Without chain + final dec (12).
12. AND 13. Separation chain, we turn and
we knit 1 sc at each point (12).
14. Without chain + final dec (10).
15. AND 16. Separation chain, we turn and
we knit 1 sc at each point (10).
17. Without chain + final dec (8).
18. Separation chain, we turn and
we knit 1 sc at each point (8).
19. Without chain + final dec (6).
20. Separation chain, we turn and
we knit 1 sc at each point (6).
21. Without chain + final dec (4).
22. Separation chain, we turn and
we knit 1 sc at each point (4).
23. Without chain + final dec (2).
24. We place the lap marker to
start knitting around the border
piece with sc.
We row.
We attach the inner part to the ears.
TAIL
Reddish brown
1. Magic ring into 6 sc.
2. İnc at all points (12).
3. “1 sc, inc”, repeat (18).
4. “2 sc, inc”, repeat (24).
5. And 6. 1 sc at each point (24).
7. “3 sc, inc”, repeat (30).
8. “4 sc, inc”, repeat (36).
9. AND 10. 1 sc at each point (36).
11. “5 sc, inc”, repeat (42).
12. “6 sc, inc”, repeat (48).
13. And 14. 1 sc at each point (48).
15. “7 sc, inc”, repeat (54).
16. “8 sc, inc”, repeat (60).
17. AND 18. 1 sc at each point (60).
19. We change to the color strong tile and
we knit 1 sc at each point (60).
20. 1 sc at each point (60).
21. “9 sc, inc”, repeat (66).
22. “10 sc, inc”, repeat (72).
22. At 50. 1 sc at each point (72).
23. At 50. 1 sc at each point (72).
51. “10 sc, dec”, repeat (66).
52. At 55. 1 sc at each point (66).
56. “9 sc, dec”, repeat (60).
57. At 60. 1 sc at each point (60).
61. “8 sc, dec”, repeat (54).
62. At 65. 1 sc at each point (54).
66. “7 sc, dec”, repeat (48).
67. At 70. 1 sc at each point (48).
71. “6 sc, dec”, repeat (42).
72. At 75. 1 sc at each point (42).
76. “5 sc, dec”, repeat (36).
77. “4 sc, dec”, repeat (30).
78. “3 sc, dec”, repeat (24).
79. And 80. 1 sc at each point.
We row
EYES (x2)
Background:
In white
1. Magic ring into 6 sc.
2. İnc at all points (12).
3. “1 sc, inc”, repeat (18).
4. “2 sc, inc”, repeat (24).
5. “3 sc, inc”, repeat (30).
6. 1 sc at each point (30).
7. We change to strong tile color and
we knit at the bottom of the chains
15 sc (we leave the rest without knitting). (fifteen).
8. To 15. Separation chain, we turn and
we knit 1 sc at each point (15).
We row.
Iris:
In black
1. Magic ring into 6 sc.
2. İnc at all points (12).
3. We change to green and weave “1 sc,
inc ”, repeat (18).
4. 1 sc at each point (18).
We row.
We sew the iris to the back of the eye, such
so that the eyelid reaches the middle,
so that it is not centered, but
closer to the center of the face.
In white we embroider the reflection and in black
we border the iris so that it stands out.
HEAD ASSEMBLY:
Once we have woven the three pieces that complete the head (snout, eyes and ears),
let’s see how we place them on the head still separated from the body.
We start with the snout:
We will place it between the skunks, being indifferent the side of the head that we choose. his
upper part will go on lap 31 of the head, while its lower part (line on the
we start knitting the white spot of the neck), we must sew it to the last round of
head, filling before completely completing the joint. This will let us loose the
neck spot, which we will sew later, once we have attached the head to the
Body.
We will sew the nose, if we have not done it before and embroider the mouth in black.
Next we sew the Eyes, on the same lap 31 of the start of the skunk, leaving
approximately 12 sc of separation between them on that same lap. Separation that will go
decreasing until it reaches its narrowest part at 5 sc, in the area between the eyebrows, between
the eyelids.
We sew the part of the eyelids so that the eye seems wrapped in them, for this
we fold them carefully, emphasizing especially the outer edges and
corners
We embroider in brown the eyebrows on them, leaving 2 sc of separation in its part more
close to the eye and about 8 sc in the furthest part.
Finally, we sew the ears to the head by bending inwards and filling them in such
so that they remain firm, but not bulky. One end will have approximately 3
sc separation with respect to the outer end of the eyelid of the eye, while the other
end of the ear will go over lap 25 of the head.
TIE
In violet
1. 40 chains that we close with a period
slipped in a circle.
2. We place the lap marker to
start knitting 1 sc in each round
point (40).
3. 1 sc at each point (40).
4. We begin to weave the Knot of the
Tie: We continue knitting 6 sc in the
bottom of the chains. (6).
We will return to this round to complete
tie.
5. To 8. Without separation chain,
we will lose 1 sc in each row, until
we have only 2 (2) left.
9. Separation chain, we turn and
we weave at the top of the
1 sc chains at each point (2).
10. Separation chain, we turn and
we knit 1 sc at each point (2).
11. AND 12. Separation chain, we turn,
we knit 1 sc at each point and we will make 1
final inc in the last sc (3) and (4).
13. To 17. Separation chain, we turn
and we knit 1 sc at each point (4).
18. AND 19. Separation chain, we turn,
we knit 1 sc at each point and we will make 1
final inc in the last sc (5) and (6).
20. To 45. Separation chain, we turn
and we knit 1 sc at each point (6).
46. And 47. Without chain + final dec
we will lose 2 sc in each row (4) and (2).
48. Without separation chain, we turn and
we knit 1 sc (1).
49. We place the lap marker
for knitting in round bordering with sc
softening the edges. Upon arriving in the area
AND READY! HAVE FUN!!
from the tie knot, we knit on the
part of the chains we set free
in row 4. We row.
We complete the tie:
With the tip of the tie down,
we weave in the part of the chains that
we leave free in row 9, 1 sc in each
point to highlight the knot (2).
We embroider the stripes in fuchsia.
We put the tie on the neck before
from sewing head to body.
Once sewn the head, we join the neck
the white spot that we had left
without sewing