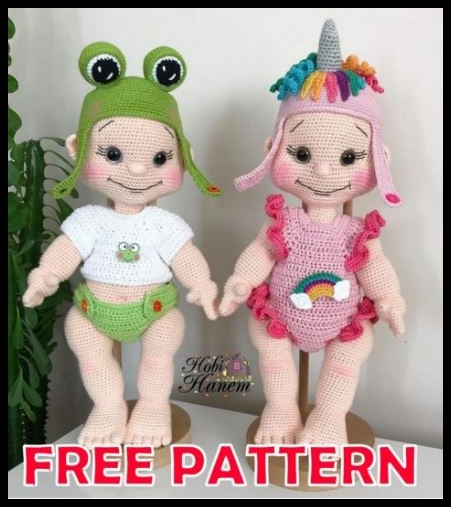
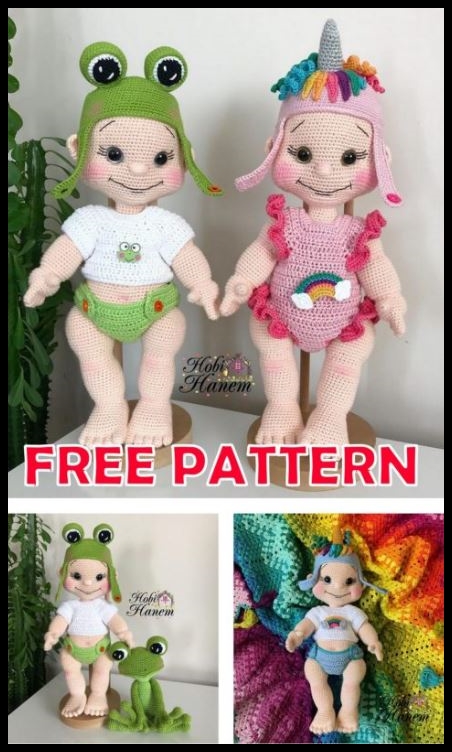
Amigurumi Doll Tonti and Yumi Free Crochet Pattern
1-1
TONTI and YUMI
BODY RECIPE
1-2
Hello friends. First of all thank you for buying and buying my design. Explanatory for you
and I put a lot of effort into making a clear recipe. For your use when knitting
I tried to enrich with pictures. As a girl or boy in the recipe
There is a baby recipe you can make. Each step you have difficulty
You can contact me from the addresses I have specified. As the toys you are ducking
If you tag on Instagram, we will see what is knitted together. FORMAT WITH PLEASURE
MATERIALS:
* Ropes: 100 gr./250 m. Himalaya Delusc Bamboo Skin Color 124-04
(about 1.5 ropes going)
(In this delicacy Snowball Organicdec is
also prefer Gazzal Baby Cotton threads
You can.)
* Crochet: 2 mm. * Eyes: 15 mm. * 30 mm joint apparatus for legs
25 mm joint apparatus for arms
* 10 cm to keep the neck upright. pipe in length
also electrical wire
* Sewing needle and fixing needle
* 8 cm long needle for shaping face
* Black domino thread for embroideries
* Bead fiber
Abbreviations:
Magic ring: magic ring
sc: single crochet
inc: increase
w: knit 3 single crochet into the same bowknot
dec: decrease
*: repeat
HDC: half double crochet
DC: double crochet
sl-st: slip stitch
ch: chain
BLO: knitting from the back lobe of the loop
FLO: knitting from the front lobe of the loop
NOTE: Unless otherwise stated, it is spiral
continue by knitting. While knitting order
loop setting so as not to confuse
You can use. Loop at the end of each row
writes the number.
1-3
!!! Due to the difference in hand tightness, some places such as knee cap protrusion in the recipe
there may be slippage. If there is a slippage according to the baby you knit
I recommend you to adjust. Knee protrusion, cheek protrusion, joint spaces
It was written separately in the knitted rows. Visuals about adjusting for yourself
will help you. You can make adjustments using pictures. HEAD
1. Magic ring 6sc
2.6inc = 12sc
3. (sc, inc) * 6 = 18sc
4. (2sc, inc) * 6 = 24sc
5. (3sc, inc) * 6 = 30sc
6. (4sc, inc) * 6 = 36sc
7. (5sc, inc) * 6 = 42sc
8. (6sc, inc) * 6 = 48sc
9. (7sc, inc) * 6 = 54sc
10 (8sc, İnc) * 6 = 60sc
11 (9SC, İnc) * 6 = 66sc
12 (10SC, İnc) * 6 = 72sc
13 (11sc, İnc) * 6 = 78sc
14 (12sc, İnc) * 6 = 84sc
15-24 (10 rows) = 84sc
25 (12sc, dec) * 6 = 78sc
26-30 (5 rows) = 78sc
31.28sc, skip 2h pull off (for eye), 13sc, skip 2h pull off (for eye), 33sc = 78sc
32. = 78sc
33. 18sc, (sc, inc) * 5 (cheek overhang), 17sc, (sc, inc) * 5 (cheek overhang), 23sc = 88sc
34-38 (5 rows) = 88sc
39.22sc, (sc, dec) * 4, 18sc, (sc, dec) * 4, 24sc = 80sc
40. 19sc, 6dec, 18sc, 6dec, 19sc = 68sc
We attach our eyes to the eye sockets. 41. 10sc, (sc, dec) * 5, 17sc, (sc, dec) * 5, 11sc = 58sc
42. 10sc, 6dec, 15sc, 6dec, 9sc = 46sc
43. (4sc, dec) * 3, 3sc, 6inc, 3sc, (dec, 4sc) * 2, dec, 2sc = 46sc
We begin to fill the head tightly with fiber.
1-4
44. = 46sc
45. (4sc, dec) * 2, 20sc, (4sc, dec) * 2, 2sc = 42sc
46. (5sc, dec) * 2, 8dec, (dec, 4sc) * 2 = 30sc
47. 6sc, 4dec, 6sc, 4dec, 2sc = 22sc
48. = 22sc Cut the rope. Fill the head tightly. * Fill and shape the cheek ridges especially tightly. Note: 34-35. We process the nose on the desks as in the picture.
* After filling the head with fiber, enter from both sides of the eyes with a long needle, eye socket
We’re doing. You can use the youtube video in the link I will write for this;
1-5
* when we want to make a man’s nose
33-34 as in the picture. On desks
We process 7 loops wide
When we want to make a girl
33-34 as in the picture. On desks
We are processing 5 loops wide.
* We process the lashes, eyebrows and mouth as in the picture. With needle or marker before machining
It will be easier if you set and process the borders with a pencil. EAR (2 pieces)
1.4 ch checks
2. (from 2nd ch) w, sc, w, sc (we attach the marker here) = 8sc
3. 3inc, sc, 3inc, sc = 14sc
4. (sc, inc) * 3, sc, (sc, inc) * 3, sc = 20sc
5. = 20sc
6. Knit another 5sc and cut the thread.
1-6
* 26-33 to 10 stitches from the edge of the eye. We sew our ears on the rows.
You can determine the location with a marker pen, either with a needle or as I did. You can obtain an oval image by sewing the ends of the ears with a loop inward. RIGHT HAND
Knit the fingers according to the order in which I write. Thumb = Magic ring 7sc, finish 3 rows 7sc.
Index Finger = Magic ring 6sc, finish 4 rows 6sc. Middle Finger = Magic ring 6sc, finish 5 rows 6sc. Ring Finger = Magic ring 6sc, finish 4 rows 6sc. Little Finger = Magic ring 6sc, 3 rows of 6sc, we continue without cutting the rope. Note: You can knit and combine the fingers separately or do what I do
You can knit with chain method like.
1-7
We move on to join the fingers:
1. (Little finger) 2sc, (ring finger) 3sc, (middle finger) 3sc, (index finger)
6sc, (middle finger) 3sc, (ring finger) 3sc, (pinky finger) 4sc = 24sc
we attach the marker here. 2. = 24sc
3. (3sc, inc) * 6 = 30sc
4. = 30sc
(We combine the thumb in the 5th and 6th rows.)
5. Hand 11sc, (finger and hand together) 3sc, hand 16sc = 30sc
6. 11sc from hand, 4sc from finger, 16sc from hand = 31sc
7.29sc, dec = 30sc
8.15dec = 15sc
Fill the hand with fiber.
9. 15inc = 30sc
10. = 30sc
11. (13sc, dec) * 2 = 28sc
12-20 (9 rows) = 28sc
little finger
Ring finger
Middle finger
Pointing finger
Thumb
1-8
21. (sc, dec) * 9, sc = 19sc
22. (sc, inc) * 9, sc = 28sc
23. (13sc, inc) * 2 = 30sc
24-29 (6 rows) = 30sc
30. 11sc, 2zn pull 2 ch skip (joint slot), 17sc = 30sc
31. = 30sc
32. (3sc, dec) * 6 = 24sc
We attach the joint to its socket. 33. (2sc, dec) * 6 = 18sc
34. (sc, dec) * 6 = 12sc
35.6dec = 6sc.
1-9
LEFT HAND
Knit the fingers according to the order in which I write. Thumb = Magic ring 7sc, finish 3 rows 7sc.
Index Finger = Magic ring 6sc, finish 4 rows 6sc. Middle
Finger = Magic ring 6sc, finish 5 rows 6sc. Ring Finger = Magic ring 6sc, finish 4 rows 6sc.
Little Finger = Magic ring 6sc, 3 rows of 6sc, we continue without cutting the rope.
Note: You can knit and combine the fingers separately or do what I do
You can knit with chain method like. We move on to join the fingers:
1. (Little finger) 2sc, (ring finger) 3sc, (middle finger) 3sc, (index finger)
6sc, (middle finger) 3sc, (ring finger) 3sc, (pinky finger) 4sc = 24sc
we attach the marker here. 2. = 24sc
3. (3sc, inc) * 6 = 30sc
4. = 30sc
(We combine the thumb in the 5th and 6th rows.)
5. Hand 14sc, (finger and hand together) 3sc, 13sc = 30sc
6. 14sc from hand, 4sc from finger, 13sc from hand = 31sc
7.29sc, dec = 30sc
8.15dec = 15sc
Fill the hand with fiber.
9. 15inc = 30sc
10. = 30sc
11. (13sc, dec) * 2 = 28sc
12-20 (9 rows) = 28sc
21. (sc, dec) * 9, sc = 19sc
22. (sc, inc) * 9, sc = 28sc
23. (13sc, inc) * 2 = 30sc
24-29 (6 rows) = 30sc
30.27sc, 2 ch skip 2 ch skip (joint slot), sc = 30sc
31. = 30sc
32. (3sc, dec) * 6 = 24sc
We attach the joint to its socket.
33. (2sc, dec) * 6 = 18sc
1-10
34 (sc, dec) * 6 = 12sc
35.6dec = 6sc.
RIGHT FOOT
Knit the fingers according to the order in which I write. Thumb = Magic ring 8sc, finish 3 rows 8sc.
Pointing Finger = Magic ring 7sc, finish 3 rows 7sc. Middle Finger = Magic ring 7sc, finish 3 rows 7sc. Ring Finger = Magic ring 6sc, finish 3 rows 6sc. Little Finger = Magic ring 6sc, finish 2 rows 6sc.
1-11
We move on to join the fingers:
1. (Little Finger) 2sc, (ring finger) 3sc, (middle finger) 4sc, (index
finger) 4sc, (thumb) 8sc, (index finger) 3sc, (middle finger) 3sc, (ring
finger) 3sc, (pinky finger) 4sc = 34sc
2. = 34sc
3. = 34sc
4. (15sc, dec) * 2 = 32sc
5-11 (7 rows) = 32sc
12. 19sc, 10 ch check 12 ch skip (for heel protrusion), sc = 30sc
13. 19sc, from 10sc ch, sc = 30sc
14. (3sc, dec) * 6 = 24sc
15. (2sc, dec) * 6 = 18sc
16. (sc, dec) * 6 = 12sc
17. 6dec = 6sc pick the thread with a needle. We have made the heel part right now.
Top
finger
1-12
Now we will start making the leg part. * We hold the foot with the fingers facing us, we attach the rope from the right side.
1. 12sc from the front, 10sc from the back = 22sc
2. (10sc, inc) * 2 = 24sc
3. (3sc, inc) * 6 = 30sc
4-13 (10 rows) = 30sc
14. 8sc, 5inc (knee protrusion), 9sc, 4dec = 31sc
15. = 31sc
16. = 31sc
17. 8sc, 6dec, 7sc, 4inc = 29sc
18. 25sc, inc, 3sc = 30sc
19. = 30sc
20. (4sc, inc) * 6 = 36sc
21. 2sc, inc, (5sc, inc) * 5, 3sc = 42sc
22-29 (8 rows) = 42sc
30.44sc, 2ch skip 2ch skip (joint slot), 36sc = 42sc
31. = 42sc
32. (5sc, dec) * 6 = 36sc
33. (4sc, dec) * 6 = 30sc
We attach the joint
34. (3sc, dec) * 6 = 24sc
35. (2sc, dec) * 6 = 18sc
36. (sc, dec) * 6 = 12sc
37.6dec = 6sc. * Decreases behind the knee cap as in the picture
should be exactly right.
* The enhancements in front of the knee cap are as forward as in the picture.
denkgel should. If 1-2 loops slip
you may not care, but if there is a noticeable shift
is due to hand difference. You can fix it for yourself.
1-13
LEFT FOOT
Knit the fingers according to the order in which I write. Thumb = Magic ring 8sc, finish 3 rows 8sc.
Pointing Finger = Magic ring 7sc, finish 3 rows 7sc. Middle Finger = Magic ring 7sc, finish 3 rows 7sc. Ring Finger = Magic ring 6sc, finish 3 rows 6sc. Little Finger = Magic ring 6sc, finish 2 rows 6sc. We move on to join the fingers:
1. (Little Finger) 2sc, (ring finger) 3sc, (middle finger) 3sc, (index finger)
3sc, (thumb) 8sc, (index finger) 4sc, (middle finger) 4sc, (ring finger)
3sc, (little finger) 4sc = 34sc
2. = 34sc
3. = 34sc
4. (15sc, dec) * 2 = 32sc
5-11 (7 rows) = 32sc
12. 3sc, 10 ch check skip 12 ch (for heel protrusion), 17sc = 30sc
13. 3sc, from 10sc ch, 17sc = 30sc
14. (3sc, dec) * 6 = 24sc
15. (2sc, dec) * 6 = 18sc
16. (sc, dec) * 6 = 12sc
17. 6dec = 6sc pick the thread with a needle. We have made the heel part right now. Now we will start making the leg part. The toes will look at us
We attach the rope from the right side.
1-14
1. 12sc from the front, 10sc from the back = 22sc
2. (10sc, inc) * 2 = 24sc
3. (3sc, inc) * 6 = 30sc
4-13 (10 rows) = 30sc
14. 8sc, 5inc (knee protrusion), 9sc, 4dec = 31sc
15. = 31sc
16. = 31sc
17. 8sc, 6dec, 7sc, 4inc = 29sc
18. 25sc, inc, 3sc = 30sc
19. = 30sc
20. (4sc, inc) * 6 = 36sc
21. 2sc, inc, (5sc, inc) * 5, 3sc = 42sc
22-29 (8 rows) = 42sc
30.26sc, 2ch skip 2ch skip (joint slot), 14sc = 42sc
31. = 42sc
32. (5sc, dec) * 6 = 36sc
33. (4sc, dec) * 6 = 30sc
We attach the joint
34. (3sc, dec) * 6 = 24sc
35. (2sc, dec) * 6 = 18sc
36. (sc, dec) * 6 = 12sc
37.6dec = 6sc.
We plug the rope from here
little finger
Sparrow
finger
1-15
BODY
1. Magic ring 6sc
2.6inc = 12sc
3. (sc, inc) * 6 = 18sc
4. sc, inc, (2sc, inc) * 5, sc = 24sc
5. (3sc, inc) * 6 = 30sc
6.2sc, inc, (4sc, inc) * 5, 2sc = 36sc
7. (5sc, inc) * 6 = 42sc
8. 3sc, inc, (6sc, inc) * 5.3sc = 48sc
9. (7sc, inc) * 6 = 54sc
10.4sc, Inc., (8sc, Inc.) * 5,4sc = 60sc
11. (9sc, inc) * 6 = 66sc
12. 5sc, inc, 8sc, 2zn pull 2 ch skip (joint slot), inc, (10sc, inc) * 2, 6sc, 2 ch check 2 ch
skip (joint slot), 2sc, inc, 10sc, inc, 5sc = 72sc
13. (11sc, inc) * 6 = 78sc
14-21 (8 rows) = 78sc
* You can attach the legs you knit into the joint socket (our starting point
on the back of the body). Then fill it tightly with the fiber. 22.36sc, 2dec, 38sc = 76sc
Right foot left foot
1-16
* The body is finished 22-23. Belly hole where we do 2dec-2inc between rows
we will do. 23. (2sc, dec) * 3, 25sc, 2inc, 25sc, (dec, 2sc) * 3 = 72sc
24. (4sc, dec) * 2, 48sc, (dec, 4sc) * 2 = 68sc
25. = 68sc
26.16sc, dec, 32sc, dec, 16sc = 66sc
27. (9sc, dec) * 6 = 60sc
28. 14sc, (2sc, dec) * 8, 14sc = 52sc
29-32 (4 rows) = 52sc
33. 13sc, (5sc, dec) * 4, 11sc = 48sc
34-40 (7 rows) = 48sc
41. 14sc, 2 ch check 2 ch skip (joint slot), 22sc, 2 ch check 2 ch skip (joint
slot), 8sc = 48sc
42. = 48sc
43. = 48sc
44. (6sc, dec) * 6 = 42sc
45. = 42sc
* You can attach the arms you knit to the joint slots. Then with fiber
fill tightly. 46. (5sc, dec) * 6 = 36sc
47. (4sc, dec) * 6 = 30sc
48. (3sc, dec) * 6 = 24sc
49. (10sc, dec) * 2 = 22sc
50. = sew long and cut the thread to sew 22 sc.
1-17
After completely filling and finishing the body
to keep the legs close to the trunk
We apply the process. I showed in the pictures
we proceed by following the stages. * A close attachment from the back of the right leg
we stick the needle from the ground. Opposite
We are subtracting by.
** We stick the needle in one or two loops from the distance. We take it out from the front.
1-18
* Again, we stick two loops from a distance and remove them from the opposite side.
* We insert the needle from two stitches apart and remove it from the back of the left leg.
* We take the needle off the rope. We pull the two ropes firmly on the right and left of the leg. Two
We pull the thread through a hole in the back of the body, as in the picture. Hanging tight again
we connect and fix. We hide the ropes.
1-19
* We make the belly button with rope.
* You can use a pipe like the picture to keep your head upright. Finally freaking out
we sew to the body. Your baby is complete. If you wish, I have prepared a different
You can enrich with clothing and accessories recipes in concepts.
1-1
FROG CONCEPT
CLOTHING (hat-shirt-cloth) RECIPE
Abbreviations:
Magic ring: magic ring
sc: single crochet
inc: increment
w: knit 3 single crochet into the same bowknot
dec: decrement
*: repeat
HDC: single (ramming) handrail
DC: double handrail
sl-st: slip stitch
ch: chain
BLO: knitting from the back lobe of the loop
FLO: knitting from the front lobe of the loop
NOTE: Unless otherwise stated, it is spiral
continue by knitting. While knitting order
loop setting so as not to confuse
You can use. Loop at the end of each row
writes the number.
MATERIALS:
* Ropes: 50 gr./125 m. Kartopu Organica 494 (Light Green)
Catania 0205 (Green)
Snowball Organica Black
Snowball Organica White
* If you wish instead of green in Catania Snowball
You can also use Organica 442 green. * Crochet: 2 mm. * Sewing needle and fixing needle
1-3
Note: When knitting, ignore the color of thread used in the pictures. in Title
Knit according to the rope colors written. The pictures are representative pictures for illustrative purposes. HAT (green Catania 0205)
1. Magic ring 6sc
2.6inc = 12sc
3. (sc, inc) * 6 = 18sc
4. sc, inc, (2sc, inc) * 5, sc = 24sc
5. (3sc, inc) * 6 = 30sc
6.2sc, inc, (4sc, inc) * 5, 2sc = 36sc
7. (5sc, inc) * 6 = 42sc
8. 3sc, inc, (6sc, inc) * 5.3sc = 48sc
9. (7sc, inc) * 6 = 54sc
10.4sc, inc, (8sc, inc) * 5.4sc = 60sc
11. (9sc, inc) * 6 = 66sc
12.5sc, inc, (10sc, inc) * 5,5sc = 72sc
13. (11sc, inc) * 6 = 78sc
14.6sc, inc, (12sc, inc) * 5,6sc = 84sc
15. (13sc, inc) * 6 = 90sc
16-27 (12 rows) = Continue without breaking the 90sc thread.
1-4
Now we move on to making the side bands of the hat.
1. Back to 7sc (we put the marker here.)
2. Skip the first hole, turn 6sc.
3. Skip the first hole 5sc.
Skip the first hole
5-26 (22 rows) = 4sc (we knit by rotating each row)
27. Skip the first hole turn 3sc
28. Skip the first hole turn 2sc
29. Skip the first hole, cut the sc thread.
We make the 2nd tape. From the place where we put the marker, rope to the 29th hole
We are installing.
1-5
1. Back to 7sc
2. Skip the first hole, turn 6sc.
3. Skip the first hole 5sc.
Skip the first hole
5-26 (22 rows) = 4sc (we knit by rotating each row)
27. Skip the first hole turn 3sc
28. Skip the first hole turn 2sc
29. Skip the first hole sc (we continue without breaking the rope of the hat and tapes
we surround it with single crochet.)
Note: When our hat is finished, the front separation of the hat will be shorter than the rear separation.
we will place the eyes and nose. Optionally sl-st the front of the hat
You can do.
1-6
EYES
Eyelid (green Catania 0205)
1. Magic ring 6sc
2.6inc = 12sc
3. (sc, inc) * 6 = 18sc
4. (2sc, inc) * 6 = 24sc
5. (3sc, inc) * 6 = 30sc
6. (4sc, inc) * 6 = 36sc
7-12 (6 rows) = 36sc
Note: 11-15 on both sides of the hat. on the rows as the picture on the eyelids
We plant.
Eyeball (with white)
1. Magic ring 6sc
2.6inc = 12sc
3. (sc, inc) * 6 = 18sc
1-7
4. (2sc, inc) * 6 = 24sc
5. (3sc, inc) * 6 = 30sc
6-11 (6 rows) = 30sc
12. (3sc, dec) * 6 = 24sc
13. (2sc, dec) * 6 = 18sc
14. (sc, dec) * 6 = 12sc
15. 6dec = 6sc
Eye Doll (with black)
1. Magic ring 5sc
2.5inc = 10sc
3. (sc, inc) * 5 = 15sc
4. (2sc, inc) * 5 = 20sc
Note: We treat the pupil with a white thread as in the picture and
We are sewing it on the circle. * We place the eyeball into the eyelid. Parts together
not steep. So you can roll the eyeball into the eyelid as we want
we can turn it to look in different directions
1-8
T-SHIRT (with white)
(*): HDC, 1 ch check, HDC into the same hole
“(*)” Explanation in red where you can see this sign
We apply. We are increasing this process. Note: Increments in the previous row by pulling the chain into the holes we created
we will do it by sinking.
1. 44 ch checks
2. Starting from 3rd ch 5 HDC, (*), 10 HDC, (*), 6 HDC, (*), 10 HDC, (*), 7 HDC
= 46 turn
3.check 2 ch, 7 HDC, (*), 11 HDC, (*), 7 HDC, (*), 11 HDC, (*), 6 HDC = 50 turns
4.2 checks, 6 HDC, (*), 12 HDC, (*), 8 HDC, (*), 12 HDC, (*), 8 HDC = 54 turns
5. 2 ch checks, 8 HDC, (*), 13 HDC, (*), 9 HDC, (*), 13 HDC, (*), 7 HDC = 58 turns
6. 2 ch checks, 7 HDC, (*), 14 HDC, (*), 10 HDC, (*), 14 HDC, (*), 9 HDC = 62 turns
7. 2 ch checks, 9 HDC, (*), 15 HDC, (*), 11 HDC, (*), 15 HDC, (*), 8 HDC = 66 turns
1-9
8. 1 ch check, 9sc, 14 ch check 18 HDC skip, 14sc, 14 ch check 18 HDC skip, 11sc = 60
frost
9. 2 ch checks, 11 HDC, (over 14 ch) 14 HDC, 14 HDC, (over 14 ch)
14 HDC, 9 HDC = 62 turns
10-13 (4 rows) 62 HDC = 62 turns
During the 14th row we make single crochet = 62sc now go behind the shirt and
we make button hole as in the picture.
1-10
BEZ (Light Green)
Note: We will knit the cloth in two pieces and stitch it together. Front Track
1. 36 ch checks
2. Return 34 HDC from 3rd ch.
3-5 (3 rows) Return to 34 HDC
6. (Skip first hole), 9 sl-st, return to 14 HDC
Pull 1 ch, (skip first hole) 12 HDC
8. Draw 1 ch, (skip first hole) 10 HDC turn
9. Shoot 1 ch, (skip first hole) 8 HDC turn
10-14 (5 rows) 2 ch pull 8 HDC finish cut the thread.
Rear Track
68 ch checks
2. Return to 66 HDC starting from Ch
3. 2 ch checks 2 HDC, (2 ch checks 2 HDC skip), 57 HDC, (2 ch checks 2 HDC skip), 3HDC turn
1-11
4.2 checks, 66 HDC turns
5.Check 2 ch, turn to 66 HDC
6. (skip first hole) 15 sl-st, turn 36 HDC (we do not knit the remaining loops)
7. (skip first hole) 1 sl-st, return to 32 HDC
8. (skip first hole) 1 sl-st, turn 28 HDC
9. (skip first hole) 2 sl-st, 22 HDC turn
10. (skip first hole) 2 sl-st, return to 14 HDC
11. (skip first hole) 2 sl-st, 8 HDC turn
12-14 (3 rows) shoot 2 chs, finish 8 HDC. Leave the thread long to sew.
* We sew 2 pieces we knit together like the picture.
* We enclose the cloth we are wearing with the single crochet method as in the picture. I recommend that you sink double single crochet into the corner parts to prevent it from puckering.
1-12
* We sew the buttons on the front part of the cloth to the places shown in the picture.
one
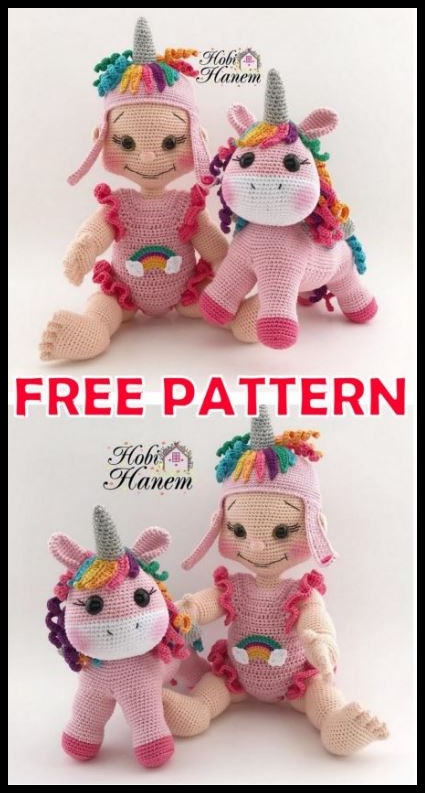
UNICORN CONCEPT
CLOTHING (hat-jumpsuit) RECIPE
Hello friends. First of all thank you for buying and buying my design. Explanatory for you
and I put a lot of effort into making a clear recipe. For your use when knitting
I tried to enrich with pictures. In the recipe, under the name of the unicorn concept
There is a unicorn hat and ruffled jumpsuit recipe. Each step you have difficulty
You can contact me from the addresses I have specified. As the toys you are ducking
If you tag on Instagram, we will see what is knitted together. FORMAT WITH PLEASURE
Abbreviations:
Magic ring: magic ring
sc: single crochet
inc: increment
w: knit 3 single crochet into the same bowknot
dec: decrement
*: repeat
HDC: single (ramming) handrail
DC: double handrail
sl-st: slip stitch
ch: chain
BLO: knitting from the back lobe of the loop
FLO: knitting from the front lobe of the loop
NOTE: Unless otherwise stated, it is spiral
continue by knitting. While knitting order
loop setting so as not to confuse
You can use. Loop at the end of each row
writes the number.
MATERIALS:
* Ropes: 50 gr./125 m. Snowball Organica;
Dark Pink-257
Pink-782
Turquoise-576
Orange-1311
MOR-1721
Yellow-1335
Catania
Green-241
Lanosa Simsim
Silver
* Crochet: 2 mm. * 3 white bonibon buttons
* 2 dark pink shirt buttons
* 1 snap
* Line sewing thread
* Sewing needle and fixing needle
3
Note: When knitting, ignore the color of thread used in the pictures. in Title
Knit according to the rope colors written. The pictures are representative pictures for illustrative purposes. HAT (light pink)
1. Magic ring 6sc
2.6inc = 12sc
3. (sc, inc) * 6 = 18sc
4. sc, inc, (2sc, inc) * 5, sc = 24sc
5. (3sc, inc) * 6 = 30sc
6.2sc, inc, (4sc, inc) * 5, 2sc = 36sc
7. (5sc, inc) * 6 = 42sc
8. 3sc, inc, (6sc, inc) * 5.3sc = 48sc
9. (7sc, inc) * 6 = 54sc
10.4sc, inc, (8sc, inc) * 5.4sc = 60sc
11. (9sc, inc) * 6 = 66sc
12.5sc, inc, (10sc, inc) * 5,5sc = 72sc
13. (11sc, inc) * 6 = 78sc
14.6sc, inc, (12sc, inc) * 5,6sc = 84sc
15. (13sc, inc) * 6 = 90sc
16-27 (12 rows) = Continue without breaking the 90sc thread.
4
Now we move on to making the side bands of the hat.
1. Back to 7sc (we put the marker here.)
2. Skip the first hole, turn 6sc.
3. Skip the first hole 5sc.
Skip the first hole
5-26 (22 rows) = 4sc (we knit by rotating each row)
27. Skip the first hole turn 3sc
28. Skip the first hole turn 2sc
29. Skip the first hole, cut the sc thread.
We make the 2nd tape. From the place where we put the marker, rope to the 29th hole
We are installing.
5
1. Back to 7sc
2. Skip the first hole, turn 6sc.
3. Skip the first hole 5sc.
Skip the first hole
5-26 (22 rows) = 4sc (we knit by rotating each row)
27. Skip the first hole turn 3sc
28. Skip the first hole turn 2sc
29. Skip the first hole sc (we continue without breaking the rope of the hat and tapes
we surround it with single crochet.)
Note: When our hat is finished, the front separation of the hat will be shorter than the rear separation.
we will place the eyes and nose. Optionally sl-st the front of the hat
You can do.
HORN
1. Magic ring 6sc
2. = 6sc
3. (2sc, inc) * 2 = 8sc
4. (sc, inc) * 4 = 12sc
5-8 (4 rows) = 12sc
9. (5sc, inc) * 2 = 14sc
10. = 14sc
11. (6sc, inc) * 2 = 16sc
12. = 16sc
6
13. (7sc, inc) * 2 = 18sc
14. (8sc, inc) * 2 = 20sc
15. = Sew and finish the thread long to sew 20sc. * 6-14 from the front, with the horn centered on the hat. on desks
We plant.
HAT DECORATION
bangs
1. 14 ch checks 2. Sl-st from 2 Ch, 2sc, 2 HDC, 8 DC (turquoise)
2. 14 ch checks 2. Sl-st from 2 Ch, 2sc, 2 HDC, 8 DC (yellow)
3. 14 ch checks 2. Sl-st from 2 Ch, 2sc, 2 HDC, 8 DC (orange)
4. 14 ch checks 2. Sl-st from 2 Ch, 2sc, 2 HDC, 8 DC (dark pink)
5. 14 ch checks 2. Sl-st from 2 Ch, 2sc, 2 HDC, 8 DC (purple)
6. 14 ch checks 2. Sl-st from 2 Ch, 2sc, 2 HDC, 8 DC (green)
7. 14 ch checks 2. Sl-st from 2 Ch, 2sc, 2 HDC, 8 DC (turquoise)
7
mane
1. Return to 50 ch check 2. 49sc from the ch (orange)
2. Return to 50 ch check 49sc from 2.ch (orange)
3. Check back at 50 ch 49sc (dark pink) starting at 2.ch
4. Check back at 50 ch 49sc from 2nd ch (dark pink)
5. Return to 50 ch check 49sc from the 2nd ch (purple)
6. Check back at 50 ch 49sc from the 2nd ch (purple)
7. Return to the 50 ch check 49sc from the 2nd ch (green)
8. Back to 50 ch check 49sc from 2nd ch (green)
9. Return to 50 ch check 49sc from 2nd ch (turquoise)
10.50 ch check back 49sc from 2nd ch (turquoise)
FIRFIR LI TULUM RECIPE (pink color)
(*): HDC, 1 ch check, HDC into the same hole
“(*)” Explanation in red where you can see this sign
We apply. We are increasing this process.
8
Note: Increments in the previous row by pulling the chain into the holes we created
we will do it by sinking.
1. 44 ch checks
2. Starting from 3rd ch 5 HDC, (*), 10 HDC, (*), 6 HDC, (*), 10 HDC, (*), 7 HDC
= 46 turn
3.check 2 ch, 7 HDC, (*), 11 HDC, (*), 7 HDC, (*), 11 HDC, (*), 6 HDC = 50 turns
4.2 checks, 6 HDC, (*), 12 HDC, (*), 8 HDC, (*), 12 HDC, (*), 8 HDC = 54 turns
5. 2 ch checks, 8 HDC, (*), 13 HDC, (*), 9 HDC, (*), 13 HDC, (*), 7 HDC = 58 turns
6. 2 ch checks, 7 HDC, (*), 14 HDC, (*), 10 HDC, (*), 14 HDC, (*), 9 HDC = 62 turns
7. 2 ch checks, 9 HDC, (*), 15 HDC, (*), 11 HDC, (*), 15 HDC, (*), 8 HDC = 66 turns
8. 1 ch check, 9sc, 14 ch check 18 HDC skip, 14sc, 14 ch check 18 HDC skip, 11sc = 60
frost
9. 2 ch checks, 11 HDC, (over 14 ch) 14 HDC, 14 HDC, (over 14 ch)
14 HDC, 9 HDC = 62 turns
10-17 (8 rows) 2 ch checks, 62 HDC = 62 turns
9
* 17. When we knit and finish the row, we connect the two ends as in the picture. A chain
we pull and cut our rope. * Now we will knit where there will be leg separation. On the front part of the piece we duck
we find the middle point and mark it.
* We count 13 loops from the left and right of the mark and mark again. Middle
we take out the marker. Markers on the sides until the overalls are completely finished
we will not subtract. * We will do over 25 stitches in total at the front. Of the place we marked
we start knitting from the knot next to it.
You can understand it better by examining the pictures.
10
18.check 2 ch, turn to 24 HDC
19.Check 1 ch, (skip first hole) 1 sl-st, 20 HDC turn
20. Shoot 1 ch, (skip first hole) 1 sl-st, turn 16 HDC
21. Take 1 ch, (skip first hole) 1 sl-st, 12 HDC turn
22. draw 1 ch, (skip first hole) 1 sl-st, 8 HDC turn
23-26 (4 rows) 2 ch shots, 7 HDC turns finish.
* Now we will knit the piece on the back. Next to the stitch we marked
We start from the loop.
Front Side
11th
18.Check 2 chs, return to 35 HDC
19.Check 1 ch, (skip first loop) 1 sl-st, return to 31 HDC
20. Take 1 ch, (skip first loop) 1 sl-st, 27 HDC turn
21. Take 1 ch, (skip first loop) 1 sl-st, 23 HDC turn
22. draw 1 ch, (skip first loop) 1 sl-st, return to 19 HDC
23.Check 1 ch, (skip first loop) 1 sl-st, return to 15 HDC
24. 1 ch draw, (skip first loop) 1 sl-st, 11 HDC turn
25. Pull 1 ch, (skip first loop) 1 sl-st, 8 HDC turn
Take 26-30 (5 rows) 2 ch, turn 7 HDC and tie the dark pink string.
* Now around the lower part of our overalls with a dark pink string like the picture
We surround the knitting single crochet.
12
* We will make a ruffle like the picture on the upper part of the legs. We attach our markers from the front to the 19th row and from the rear to the 20th row.
* Now we will knit a ruffle between this marked place. 1. Double HDC for each loop between the places we have marked, e.g. Frost. 2. Double HDC for each loop between the places we have marked, e.g. Frost. 3. We knit single crochet in each loop between the places we have marked and finish.
* We apply the same procedure to the other leg.
13
* We will now ruffle the arms. On the top of the arm as shown
we wear the crochet hook. We will knit a ruffle on 18 HDC that we jumped in 8th on the overalls. During the 1st row we knit double HDC on each loop. During the 2nd row we knit double HDC on each loop. Along the 3rd row, we knit single crochet in each loop and finish.
* We apply the same process to the other arm.
* Now we will knit buttonhole for the back, button snap on the net and back
We will sew buttons on the part. We will do this by following the pictures. * Chain on the back where we want to knit flat places with single crochet and make buttonholes
We’re shooting.
14
RAINBOW APPLIQUE
1.8 ch checks
2. starting from 2nd ch 7inc = 14sc (each
we will change the color in the order)
3-7 (5 rows) = 14sc
Clouds (2)
1.7 ch
2. from the 2nd ch inc, sc, 2
3-hand railing, sc, last remaining
chain w, sc, 2 of 3
finish handrail, sc, sl-st.
15
We sew the cloud to two sides as in the picture. Then on my overalls
we place and sew.