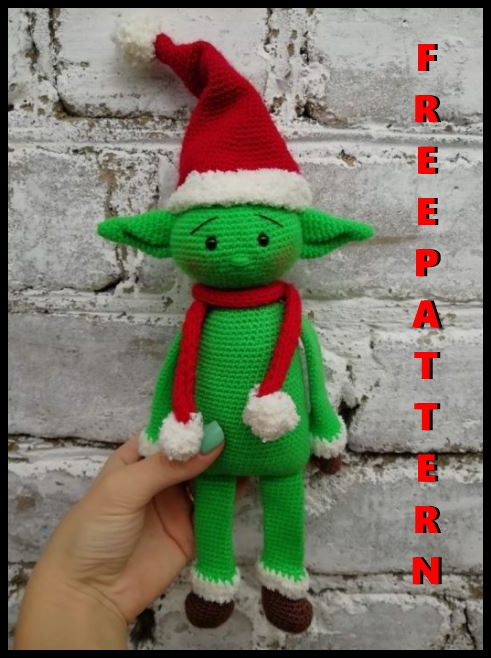
Amigurumi Christmas Elf Free Crochet Pattern
In this article I will share with you amigurumi christmas elf free crochet pattern. We always keep you up-to-date with Amigurumi.
Materials:
1.Alize softy white yarn
2.Green, red, brown yarnart jeans yarn
3.Hook 2.5mm
4.Marker
5. Eyes on 6mm secure mount
6. 2mm knitting needles
Abbreviations:
Sc – single crochet
İnc – increase
Dec – decrease
Blo – back half loop
Ch – chain
Dc – Double crochet
Legs
Start brown
1. [Sc] × 6 into magic ring
2. [İnc] × 6 (12)
3. [Sc, inc] × 6 (18)
4. [2sc, inc] × 6 (24)
5. [Sc for blo] (24)
6. -8. [Sc] (24)
9.8sc, [dec] × 4, 8sc (20)
10.8sc, [dec] × 2, 8sc (18)
11.8sc, dec, 8sc (17)
12. [Sc] (17)
Crammed
Change the color to white, then do not stuff
13.-14. [sc] (17)
Change color to green
15.7 sc, 2dec, 6sc (15)
16.-35. [Sc] (15) (20 rows)
Knit 4 more sc. Fasten and cut the thread. We also knit the second leg.
Fold one leg in half, knit 7 sc, 5 ch, fold the second leg and
on it 7 sc.
Body
1.We knit for half loops 7sc, 5sc in ch, 7sc, then on the other side 7sc, 5sc in
ch, 7sc. Then we knit as usual
2.2sc, [5sc, inc] × 6 (44)
3. 2sc, [6sc, inc] × 6 (50)
4. 2sc, [7sc, inc] × 6 (56)
5. – 14. [Sc] (56) (10 rows)
15. [Dec, 26sc] × 2 (54)
16. – 25. [Sc] (54)
26. [7sc, dec] × 6 (48)
27. – 33. [Sc] (48)
34. [6sc, dec] × 6 (42)
35. – 38. [Sc] (42)
Start stuffing your torso
39. [5sc, dec] × 6 (36)
40. [4sc, dec] × 6 (30)
41. [3sc, dec] × 6 (24)
42. [2sc, dec] × 6 (18)
43. [Sc] (18)
Tightly fill the body of the dock
Head
1. [2sc, inc] × 6 (24)
2. [3sc, inc] × 6 (30)
3. 2sc, inc, [4sc, inc] × 5, 2sc (36)
4. [5sc, inc] × 6 (42)
5. 3sc, inc, [6sc, inc] × 5, 3sc (48)
6. [7sc, inc] × 6 (54)
7. 4sc, inc, [8sc, inc] × 5, 4sc (60)
8. [9sc, inc] × 6 (66)
9. – 17. [Sc] (66) (9 rows)
Start typing.
Embroider the nose with green yarn in the middle between 10 and 11 rows.
Fix the eyes between 13 and 14 rows at a distance of 7 loops.
18. [9sc, dec] × 6 (60)
19. 4sc, dec, [8sc, dec] × 5, 4sc (54)
20. [7sc, dec] × 6 (48)
21. 3sc, dec, [6sc, dec] × 5, 3sc (42)
22. [5sc, dec] × 6 (36)
23. 2sc, dec, [4sc, dec] × 5, 2sc (30)
24. [3sc, dec] × 6 (24)
25. Sc, dec, [2sc, dec] × 5, sc (18)
26. [Sc, dec] × 6 (12)
Fill the head of the dock
27. [Dec] × 6 (6)
Pull the hole, cut the thread and hide
The ears
1.6c into magic ring
2. [Sc] × 6 (6)
3. [Sc, inc] × 3 (9)
4. – 5. [Sc] × 9 (9)
6. [2sc, inc] × 3 (12)
7. [Sc] (12)
8. [2sc, inc] × 4 (16)
9. Sc, [inc, 3sc] × 3, inc, 2sc (20)
10. [4sc, inc] × 4 (24)
11. Sc, [inc, 5sc] × 3, inc, 4sc (28)
12. – 14. [Sc]
Thread cut, fasten
Fold the ear in half, grab it with one stitch
Hands
Start brown
1. [Sc] × 6 (6)
2. [İnc] × 6 (12)
3. – 4. [Sc] (12)
5.5 sc, 4dc in ice , 5sc, inc (16)
6. 6sc, dec (3sc), ch, 6sc, inc (16)
7. [Sc] (16)
Change color to white
8.- 9. [Sc] (16)
Change color to green
10. – 18. [Sc] (16)
19. Dec, 14sc (15)
20. – 28. [Sc] (15)
29. Dec, 13sc (14)
30. – 38. [Sc] (14)
2 sc, ch
Fold your hand in half, knit 7 sc.
Cap
Start in red
1.4 sc
2.-3. [Sc] × 4
4. [Sc, inc] × 2 (6)
5. – 7. [Sc] (6)
8. [İnc] × 6 (12)
9. – 11. [Sc] (12)
12. [Sc, inc] × 6 (18)
13. – 15. [Sc] (18)
16. [2sc, inc] × 6 (24)
17. – 19. [Sc] (24)
20. [3 sc, inc] × 6 (30)
21. – 23. [Sc] (30)
24. [4sc, inc] × 6 (36)
25. – 27. [Sc] (36)
28. [5sc, inc] × 6 (42)
29. – 31. [Sc] (42)
32. [6sc, inc] × 6 (48)
33. – 35. [Sc] (48)
36. [7sc, inc] × 6 (54)
37. – 39. [Sc] (54)
40. [8sc, inc] × 6 (60)
41. – 43. [Sc] (60)
Change color to white
44. [Sc, dec] × 20 (40)
45. [Sc] (40)
Fasten the thread, cut.
From yarn of white color make three small pompons. Attach one to the end
cap.
From a red yarn on knitting needles of 2 mm, knit a scarf of the desired length.
Knit 6 stitches, knit the first row with the front, the second row with the wrong ones, and
so to the end. Attach pompons to the ends of the scarf.
Assembly
Sew hands to the body on the sides at the level of 38 rows.
Sew ears to the head on the sides between the 8th and 15th rows
Sew a cap with a pair of stitches on the sides to the head.
Embroider eyebrows over the eyes, tint cheeks (optional).
Your gnome is ready!