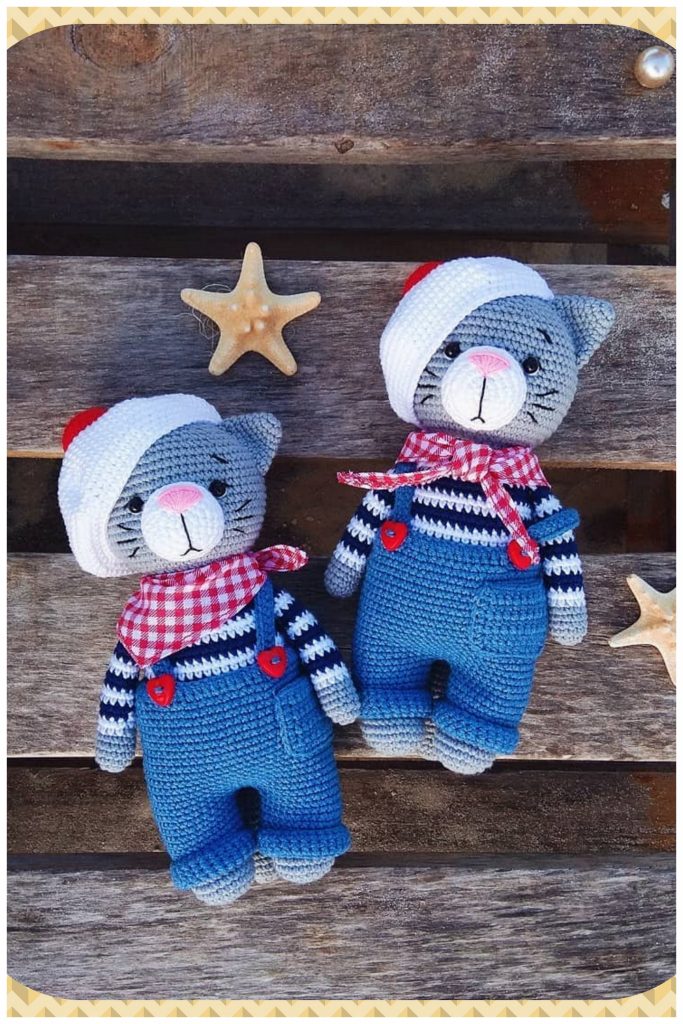
Amigurumi Cat Jeremy Free Crochet English Pattern
In this article we will share a beautiful amigurumi cat jeremy free pattern. You can find everything you want about Amigurumi.

Required materials and tools:
- Yarn – Gazzal Baby Cotton half-cotton 50g / 165m, color No. 3430 (gray), color
No. 3438 (dark blue), color No. 3431 (jeans), color No. 3432 (white), color No. 3443
(Red poppy) - Hook №2
- Filler – holofiber
- Beads for eyes with a diameter of 6mm
- A bit of black, white and pink yarn for embroidery
- Needle for stitching, scissors, pins, marker for knitting
- Cut fabric size 27 * 9 cm (for scarves)
- Buttons – 2pcs
- Sewing machine (optional)
abbreviations
Magic ring – Magic ring
sc– single crochet
Ch – Chain
inc – increase
Dec – Decrease
sl-st – slip stitch
DC – double crochet
The size of the finished toy using these materials is about 20 cm
Arms
Link two parts. Stuff in the process of knitting. Tightly fill the bottom,
further fill medium, the top part is not necessary to fill.
Start in gray:
1: Magic Ring 6sc
2: 6 inc (12sc)
3-6: 12sc
Change color to white.
7-8: 12sc
Change the thread to dark blue.
9-10: 12sc
Change color to white.
11-12: 12sc
Change the thread to dark blue.
13-14: 12sc
Change color to white.
15-16: 12sc
Change the thread to dark blue.
17-18: 12sc
Change color to white.
19-20: 12sc
Change the thread to dark blue.
21-22: 12sc
Change color to white.
23: 12sc
Knit another 6sc, then fold the edges of the parts together, knit 6sc.
Thread to fasten, cut off.
Tail:
Stuff in the process
knitting. Tightly fill the bottom, then
to fill medium, the upper part is not necessary to fill.
Knit in gray:
1: Magic ring into 6sc
2: binc in each loop (12sc)
3-25: 23 row 12sc
Fold the edges of the parts together, knit 6sc. Thread to fasten, cut off.
Legs + Body:
First knit the first leg. Legs and body tight
stuff in the knitting process.
Start in gray:
1: Magic ring 6sc
2: 6inc (12sc)
3: (1sc, inc) * 6 (18sc)
4: 1sc, inc, (2sc, inc) * 5, 1 sc (24sc)
5-7: 24sc
8: 6sc, 6dec, 6sc (18sc)
9: (4sc, dec) * 3 (15sc)
10-12: 15sc
13: (4sc, inc) * 3 (18sc)
14-16: 18sc
17: (5sc, inc) * 3 (21sc)
Knit another 7sc, sl-st. Finish knitting,
thread to fasten and cut.
Tie the second leg in the same way as the first, but after 17 rows, knit another 18sc.
The thread does not cut, and continue to knit the body. (You may need another
the number of loops after the 17th row, then you need to adjust it yourself.)
18: from the second leg dial a chain of
6ch and attach to the first leg where
finished knitting (in the loop following
ss). Make sure the legs look
straight.
Next knit 21sc on the first part,
6sbn chain of air loops, 21sc
on the second part, 6sc on the back
chains of air loops (54sc)
In this place you need to set the marker
(marker is in front)
19-26: 54sc (8 rows)
In the next row you need to engage the tail.
Make sure that the tail is located
exactly in the middle.
27: 22sc, 6sc (to bind a tail), 26sc (54sbn)
28: (7sc, dec) * 6 (48sc)
Next, you need to align the marker exactly
middle of the back. For this I needed
knit 22sc (you might need
knit a different number of loops), and in
Next loop change color to dark blue.
Now here will be the beginning of the next row,
set the marker.
29-30: 48sc
Change color to white.
31: 48sc
32: (10sc, dec) * 4 (44sc)
Change the thread to dark blue.
33-34: 44sc
Change color to white.
35-36: 44sc
Change the thread to dark blue.
37-38: 44sc
Change color to white.
39: 44sc
40: (9sc, dec) * 4 (40sc)
Change the thread to dark blue.
41-42: 40sc
Change color to white.
43: (8sc, dec) * 4 (36sc)
In the next row you need to knit handles.
Make sure that they are located
symmetrically on the sides of the body.
44: 9sc, 6sc (to knit the handle), 12sc, 6sc
(tie in the handle), 3sc (36sc)
Change the thread to dark blue.
45: (4sc, dec) * 6 (30sc)
46: 30sc
Change the thread to gray.
47: (3sc, dec) * 6 (24sc)
48-49: 24sc
Taurus is ready. Further, without tearing the threads,
continue to knit your head. We fill very tightly
Head:
50: inc in each loop (48sc)
51: (7sc, inc)*6 (54sc)
52: 4sc, inc, (8sc, inc)*5, 4sc (60sc)
53-64: 60sc
65: 4sc, dec, (8sc, dec)*5, 4sc (54sc)
66: (7sc, dec)*6 (48sc)
67: 3sc, dec, (6sc, dec)*5, 3sc (42sc)
68: (5sc, dec)*6 (36sc)
69: 2sc, dec, (4sc, dec)*5, 2sc (30sc)
70: (3sc, dec)*6 (24sc)
71: 1sc, dec, (2sc, dec)*5, 1sc (18sc)
72: (1sc, dec)*6 (12sc)
Fasten and cut the thread, leaving a long tip with which to pull off
the remaining hole. The tail of the thread is hidden inside the head.
Ears:
Link the two details in gray.
No need to stuff.
1: Magic ring 6sc
2: (1sc, inc)*3 (9sc)
3: (2sc, inc)*3 (12sc)
4: (5sc, inc)*2 (14sc)
5: (6sc, inc)*2 (16sc)
6: (7sc, inc)*2 (18sc)
7: (8sc, inc)*2 (20sc)
Thread to fasten, cut, leaving
long end for sewing.
Muzzle:
Knit white.
1: Magic ring 6sc
2: 6inc (12sc)
3: (1sc, inc) * 6 (18sc)
4: 1sc, inc, (2sc, inc) * 5, 1 inc (24sc)
5: (3sc, inc) * 6 (30sc)
6:30 sc
Thread fasten, cut, leaving a long
the end for sewing.
First you need to sew the muzzle.
Locate the face approximately between 51 and 61 next
heads, pin pins (make sure that it is located in the center).
Sew, in the process of sewing inside, put the filler.
On both sides of the muzzle sew eyes. To do this, mark with pins.
the locations of the peepholes, which are between 59 and 60 near the head,
the distance between the points is 10-11sc. When sewing, make
a small tie White thread stitches around the peephole to look
turned out to be more “alive”. Black thread you can add eyelid rather.
On the muzzle with pins mark the location of the nose, embroider with pink thread.
Embroider mouth with black thread, eyebrows and antennae.
Pins mark the location of the ears, sew approximately between 61
and 70 next (make sure the ears are sewn symmetrically).
Trousers:
Knitting pants starts at the top.
Color “jeans” dial a chain of
54ch and with the help of ss to close it in a circle.
1: 2ch lifting, 54DC, sl-st
2: (8sbn, surf) * 6 (60sbn)
3-7: 60sc
In the next row you need to do
hole for the tail.
8: dial a chain of 6ch, 6sc
previous row skip, continue
knitting in the next loop, 54sc (60sc)
9-18: 60sc
Next, knitting is divided as follows:
28sc (pant leg), 2sc, 28sc (pant leg), 2sc.
It is necessary to arrange the leg so that
the hole for the tail was exactly in the middle.
For this I needed to knit 4sc
(maybe you will have a different amount
loops), then count down 28sc and connect to
a circle. Continue knitting already at 28 loops.
19-29: 28sc
Finish knitting ss, fasten and cut the thread,
hide thread tip.
Next, go back to the beginning of knitting trousers, count off from the first 2 sc (this will be the distance between them), tie the thread, leaving a loose tail about 20cm.
Count off 28sc, use sl-st to connect
in a circle and knit again 11 rows of 28sc.
Next, finish the knitting sl-st, fasten and thread
cut off, the tip of the thread hide.
Sew up the tip of the thread
distance between the legs.
Pocket:
Knit in rotating rows, each row
start with a 1ch climb.
Dial a chain of 10ch + 1ch lifting.
First row start from the 2nd from hook loop.
1-8: 10sc
To tie the sides of the pocket sbn thread fasten
and cut off leaving a long tip for
sewing on
Webbing:
Tie 2 pieces of the desired length. To me
it took to dial 28ch maybe
you will have a different amount
(depends on the density of knitting).
Knit in rotating rows. When typing
initial chain, leave free
tail about 20cm.
Dial a chain of 28ch + 1ch lifting.
First row start from the 2nd from hook loop.
1: 28sc, 1ch lifting
2: 28sc
Thread to fasten and cut, leaving
tip for sewing.
Sew the straps to the pants, front
sew decorative buttons.
Sew a pocket.
Beret:
Knit white:
1: Magic ring 6sc
2: 6inc (12sc)
3 : (1sc, inc) * 6 (18sc)
4 : (2sc, inc) * 6 (24sc)
5 : (3sc, inc) * 6 (30sc)
6 : (4sc, inc) * 6 (36sc)
7 : (5sc, inc) * 6 (42sc)
8 : (6sc, inc) * 6 (48sc)
9: (7sc, inc) * 6 (54sc)
10 : (8sc, inc) * 6 (60sc)
11: (9sc, inc) * 6 (66sc)
12 : (10sc, inc) * 6 (72sc)
13 : (11sc, inc) * 6 (78sc)
14: (12sc, inc) * 6 (84sc)
15-17 : 84sc
18 : (12sc, dec) * 6 (78sc)
19 : (11sc, dec) * 6 (72sc)
20: (10sc, dec) * 6 (66sc)
21 : 66sc
Finish knitting ss, fasten and thread
cut off, the tip of the thread hide.
Pompon:
Knit in red, fill in the process
knitting.
1: Magic ring 6sc
2: 6inc (12sc)
3 : (1sc, inc) * 6 (18sc)
4 : (2sc, inc) * 6 (24sc)
5-8: 24sc
9 : (2sc, dec) * 6 (18sc)
10 : (1sc, dec) * 6 (12sc)
Thread fasten, cut, leaving a long
the end for sewing.
Pompon sew to the top of the beret.
Solitaire:
On paper, make a pattern in the size indicated on the photo.
Transfer the pattern to the fabric, leave the allowances of 0.7-1cm for hemming, cut.
Process edges, bend and stitch
Congratulations!
Your kitty Jeremy is ready!
I hope the process of creating it was easy and fun for you, and
The result met all your expectations!