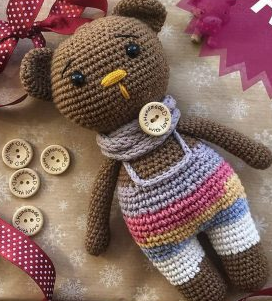
Amigurumi Teddy Bear Pofu Free Crochet Pattern
Amigurumi teddy bear pofu free crochet pattern, we continue to bring you the latest free amigurumi knitting toy models.
You can find all kinds of amigurumi patterns on our site.
Materials
Snowball Amigurumi hand knitting ropes;
Brown (K890) color rope
White (K010) color rope
Bebe Blue (K544) color rope
Yellow (K331) color rope
Pink (K763) color rope
Lilac (K705) color rope
2 mm crochet hook
Bead fiber
8 mm locking eye
Wooden decorative button
Terms Used
sh: Magic ring sc: single crochet ch: chain
inc: increase by making 2 single crochets in the same loop
w: increase by making 3 single crochets in the same loop
dec: decrease by taking 2 single crochets
m: 3 single crochet
hdc: half double crochet dc: double crochet en: triple crochet
popcorn: popcorn crochet stitch
BLO: Making a single crochet in the lobe behind the loop Looping the process written in parentheses by the number multiplied
Fabrication
The finished size of our teddy can vary according to our string. My knit is 20 cm tall.
Legs (2 Pieces)
Weave with brown color rope.
1) magic ring into 6sc
2) 6inc (12sc)
3) (1sc, 1inc)*6 (18sc)
4-10) 18sc
White color on the rope.
11-15) 18sc
We’re going blue.
16-17) 18sc
Leg one over. We connect the second in the same way without pulling a chain. We continue to knit the body.
Body
1) 18sc + 18sc (36sc)
We’re moving on a yellow rope.
2) (5sc, 1inc) * 6 (42sc)
3) (6sc, 1inc) * 6 (48sc)
We’re going on a pink rope.
4-6) 48sc
We’re moving on a lilac color string.
7-9) 48sc
10) (6sc, 1dec) * 6 (42sc)
11) 42sc as BLO
12) 42sc
We’re going on a brown rope.
13) (5sc, 1dec)*6 (36sc)
14-15) 36sc
16) (4sc, 1dec)*6 (30sc)
17-18) 30sc
19) (3sc, 1dec)*6 (24sc)
20-22) 24sc
23) (2sc, 1dec)*6 (18sc)
24) 18sc
Head
We continue through the hull.
1) (2sc, 1inc)*6 (24sc)
2) (3sc, 1inc)*6 (30sc)
3) (4sc, 1inc)*6 (36sc)
4) (5sc, 1inc)*6 (42sc)
5) (6sc, 1inc)*6 (48sc)
6) (7sc, 1inc)*6 (54sc)
7) (8sc, 1inc)*6 (60sc)
8-18) 60sc
19) (8sc, 1dec)*6 (54sc)
20) (7sc, 1dec)*6 (48sc)
21) (6sc, 1dec)*6 (42sc)
22) (5sc, 1dec)*6 (36sc)
23) (4sc, 1dec)*6 (30sc)
24) (3sc, 1dec)*6 (24sc)
25) (2sc, 1dec)*6 (18sc)
26) (1sc, 1dec)*6 (12sc)
27) 6dec
We close the opening with a needle.
Handles (2 Pieces)
Weave with brown color rope.
1) magic ring into 6sc
2) 6inc (12sc)
3-5) 12sc
6) (4sc, 1dec)*2 (10sc)
7-22) 10sc
We only fill the hand part of the arms, reducing the fiber towards the shoulder. So his arms don’t stay up.
Ears (2 Pieces)
Weave with brown color rope.
1) magic ring into 6sc
2) 6inc (12sc)
3) (1sc, 1inc)*6 (18sc)
4) (2sc, 1inc)*6 (24sc)
5-8) 24sc
9) (2sc, 1dec)*6 (18sc)
Overalls Hangers
Weave lilac color with rope.
1) Starting from the back, we start to pass the front face of the BLO, which we knit in 26th place. Weave 5 sc in the back and 10 sc in the front and weave the hanger between the body by centering. First we knit five sc from the back and draw 20ch.
2) When we knit 10 sc we are centered in the front side, we draw 10 sc, we pull 20ch again and pass to the back and we begin to knit to the starting point of 5 sc.
Eyes and Nose
Weave with black and yellow color rope.
1) When processing the nose, we go back and forth several times horizontally with 6 sc in between. For the mouth line, we process two turns of 5 rows vertically.
2) Eyes 51-52. 10 sc. While processing the eyebrows, we make a lower start from the upper point of the eye and sinking one sc away from the other end of the eye. The length of the eyebrow will be about 4 sc. You can see in detail in the photo.
Weft
Weave lilac color with rope.
1) Using the prison work technique, we knit and sew weft starting from 4ch long enough to wrap around the neck three times. You can also make flat knitting with skewers if you want.
2) Instead of sewing, we sew our wooden button as decor.
Combining
1) We fill the arms and fold the mouth part in half and sew it and sew it down one row from the neck.
2) After knitting the ears, we fold them in half and sew them like arms. We plant about 5 sc away from the vertex. Don’t forget to sew with care that the ears stand symmetrical.