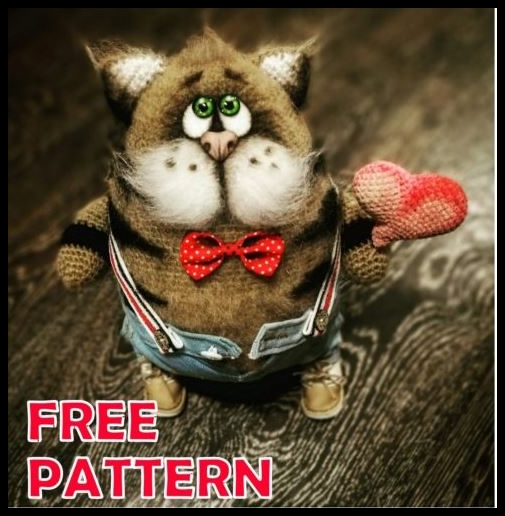
Amigurumi Cat Ob-zhorik Free Crochet Pattern
Cat Ob-Zhorik
author – Anya Chernyshok
We need: hook number 1.5, blue mohair, white acrylic, wool for
felting white and pink, felting needle, filler (I have a firework),
plastic eyes (you can use beads or blind eyes from
plastics).
Legend:
ch. – chain
sc – single crochet
We start to knit from the head.
1st row: 2 ch, in the 2nd loop from the hook we knit 6 sc. (6)
2 row: 6inc (12)
3rd row: sc., Inc – 6 times (18)
4th row: 2sc, inc – 6 times (24)
5 row: 3sc, inc – 6 times (30)
6 row: 4 sc, inc – 6 times (36)
7 row: 5 sc, inc – 6 times (42)
8 row: 6 sc, inc – 6 times (48)
9 row: 7 sc, inc – 6 times (54)
10-13 row: sc in a circle (54)
14th row: 8 sc, inc – 6 times (60)
15-17 row: sc in a circle (60)
18 row: 9 sc, inc – 6 times (60)
19 row: sc. in a circle (66)
Next we knit the body
20-22 row: sc in a circle (66)
23 row: 9 sc, dec – 6 times (60)
24-25 row: sc in a circle. (60)
26 row: 8 sc, dec – 6 times (54)
28 row: 7 sc, dec – 6 times (48)
29 row: 6 sc, dec – 6 times (42)
30 row: 5 sc, dec – 6 times (36)
31 row: 4 sc, dec – 6 times (30)
32 row: 3sc, dec – 6 times (24)
Stuff tight enough
33 row: 2 sc, dec – 6 times (18)
34 row: 1 sc, dec – 6 times (12)
35 row: dec – 6 times (6)
Next, we knit handles (2 parts)
1st row: 2 ch, in the 2nd loop from the hook we knit 6 sc. (6)
2 row: 6inc (12)
3rd row: sc., Inc – 6
times (18)
4th row: 18 sc in a circle (18)
5 row: 1 sc, dec –
6 times (12)
6-12 row: 12 sc in a circle (12)
We stuff the handle
13 row: 2 sc together – 6 times.
Now we knit the legs (2 parts)
1st row: chain of 7 ch. In the 2nd loop from the hook we knit 3sc further
4sc, repeat from the back of the chain 3 sc in one loop, 4 sc. (14)
2 row: (2 sc each in the next 3 loops, 4 sc) repeat 2 times (20)
3-5 row: we knit in a circle sc (20)
6th row: we knit 2 loops together 3 times, then 14 sc (17)
7 row: we knit 2 loops, then 15 sc (16)
8-13 row: 16 sc in a circle (16)
14th row: 1 sc, 2 sc together. – 5 times, 1 sc (10)
Stuff the leg tight enough, but without stretching the loop.
15 row: 2 sc together – 5 times. (5)
Knit ponytail
1st row: 2 ch, in the 2nd loop from the hook we knit 6 sc. (6)
2 row: 6inc (12)
3rd row: sc., Inc – 6 times (18)
4-5 row: sc in a circle (18)
6 row: 4 sc, dec – repeat 3 times (15)
7 row: sc in a circle (15)
8 row: 3 sc, dec – repeat 3 times (12)
9-16 row: sc in a circle (12)
Leave a long thread for sewing.
Stuff the tail.
Knit ears (2 parts)
1st row: 2 ch, in the 2nd loop from the hook we knit 3 sc. (3)
2 row: 3inc (6)
3rd row: sc., Inc – 3 times (9)
4 row: 2 sc., Inc – 3 times (12)
5 row: sc., Inc – 6 times (18)
Leave a long thread for sewing.
As a result, we should get the following
Now we take the usual Velcro, or rather that part of it, on which
hooks and carefully comb all the details across the hinges. Our cat
should become evenly fluffy.
Now we start assembly, for this we need the following
tools: durable cotton thread, long needle with a large eye and
pliers.
First of all, we sew the foot pens. We catch the thread in a few loops
paws and stretch through the needle through the trunk. This process may be
quite complicated, so we help ourselves with pliers.
In the same way, we catch the second foot and stretch the needle in the same place through
all torso
In a similar way we attach the legs
Next, sew on the ears and tail.
The time has come to draw up the face. For this, a small lump of white
we lay the wool on the head of our cat. Then take a little pink
wool and form a nose on the muzzle.
Next, with a strong cotton thread, we tighten the place for future eyes.
Before gluing the eyes, we tint the eye sockets, ears and draw
banding to our cat. I use oil for this
art pencils, but ordinary color or shadows may work
for makeup.
It remains to glue the eyes and embroider the antennae.
Our cat is ready.